Last week I have shown you the bare bone basics of LaTeX. We learned how to create a simple hello world document, and the usual boilerplate code that goes into the preamble. Lets move on to slightly more complex ideas.
I want to start with the meta-information you can add to your document. Each paper you create will likely have a title, author and creation date. Latex has special commands you can use to insert that info into the preamble:
\title{My Document}
\author{Lukasz Grzegorz Maciak}
\date{\today{}}
Note that the date command will accept anything as an argument – you don’t have to format your input in some special way. In the sample above I am using a latex command \today{} in order to add the current date to the document. This means that your work will have the date of the day when it was last compiled. If you go back to your work, make changes and re-compile it, the date will be adjusted automatically.
This information will now be used throughout the document for things like headers and footers and etc. It won’t be displayed at the top of your document unless you actually want to though. If you do just put \maketitle somewhere below the \begin{document} like this:
\documentclass[10pt, letterpaper]{article}

\title{My Document}
\author{Lukasz Grzegorz Maciak}
\date{\today{}}

\begin{document}
\maketitle

Lorem ipsum dolor sit amet ...
\end{document}
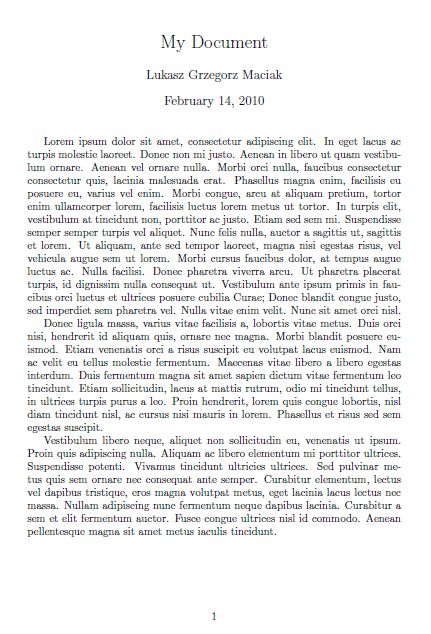
This should produce something like this:
By the way, notice how each paragraph in the sample above is indented. This is automatic. In my source code I simply leave a blank line between paragraphs (a bit like in this blog) and LaTeX does the rest. If you don’t like the indentation, you can always suppress it by adding \noident at the begging of a paragraph.
Starting documents this way is nice, but there are cases where it is appropriate to have the title, author and date on a separate page (for the sake of this tutorial let’s call that special page a “title page”. Also for the sake of this tutorial imagine me saying “title page” in Dr. Evil’s voice why making air-quotes gesture why Seth Green rolls his eyes in the background). Let me show you how it’s done:
\documentclass[10pt, letterpaper, titlepage]{article}
Yep, it’s that easy. Just pass a single optional argument to your \documentclass{} and you are done.
Our next step would be to add some structure to our document – for example, lets say you want to break it up into sections and subsections like this:
\section{This is a section}
\subsection{This is a subsection}
\subsubsection{This is a subsubsection}
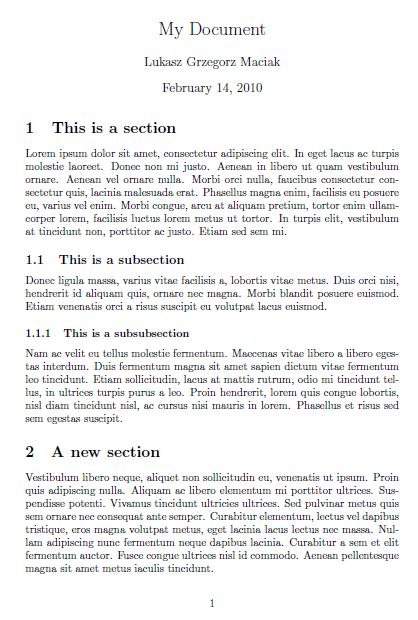
Here is an output sample with some lorem ipsum added in between the section headings to make it look more like a real document – just so that you can get the sense of the relative font sizes and spacing:
That’s exactly how you use these. Sections are not environments – you don’t need to open and close them – they are one shot commands. Note the numbering that was added to my document. It is automatic, and inserting new subsection somewhere in the text will automatically re-enumerate everything at compile time so you don’t even have to think about it.
By default LaTeX supports seven levels of document subdivision: part, chapter, section, subsection, subsubsection, paragraph and subparagraph. They all work in the same way, main difference being the formatting. For example, the chapter command (which is only defined in report and book document classes) will force a page break and will make the title take up half the page. Paragraph and subparagraph on the other hand don’t usually get numbered but you can change that if you want.
You can suppress the numbering on any of these elements by adding an asterisk after the command name but before the arguments like so:
\section*{Non numbered section}
Now that we have the whole document broken down into logical parts, the next step would be to generate table of contents no? Once again, all you need is a simple single word command called \tableofcontents. You can put it wherever you want in your document. I usually include it at the beginning like so:
\begin{document}
\maketitle
\tableofcontents
\newpage
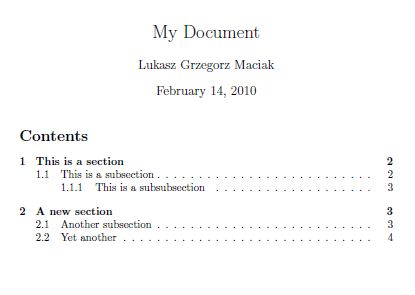
Note that I also used \newpage command that I believe should be quite self-explanatory. It forces a page break so that my table of contents is on a page of its own accompanied only by the document title information:
You now know how to structure your papers in LaTeX. I bet you are dying to find out how to do basic font formatting operations such as making your text bold, italic and etc. It is actually incredibly easy and can usually be accomplished using one of the “text” commands like the ones below:
\textit{This text is italic} \\

\textsl{This text is slanted} \\

\textbf{This text is boldface} \\

\texttt{This text is in typewriter font} \\

\textsc{This text is in small caps} \\

\emph{This text is emphasized}
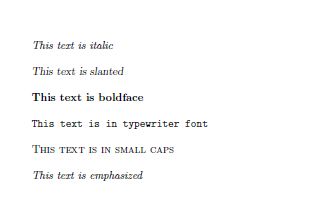
Note how I used the \\ an a line break at the end of each line. This is basically the LaTeX way of saying <br;> or Shift+Enter (in Word) – a mid paragraph soft line break. Here is a sample output:
Note that you can nest these commands like this:
\textbf{\textit{\texttt{Boldface. italicized typewriter font}}}
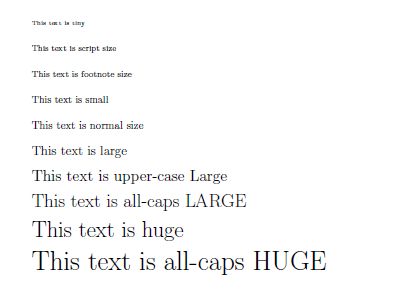
There are also several formatting environments that let you change the size of your font appropriately (think <big> and <small> tags from HTML). They are as follows:
\begin{tiny}This text is tiny\end{tiny} \\

\begin{scriptsize}This text is script size\end{scriptsize} \\

\begin{footnotesize}This text is footnote size\end{footnotesize} \\

\begin{small}This text is small\end{small} \\

\begin{normalsize}This text is normal size\end{normalsize} \\

\begin{large}This text is large\end{large} \\

\begin{Large}This text is upper-case Large\end{Large} \\

\begin{LARGE}This text is all-caps LARGE\end{LARGE} \\

\begin{huge}This text is huge\end{huge} \\

\begin{Huge}This text is all-caps HUGE\end{Huge} \\
And here is some output. Note that the normalsize is the “default” font size as set in your \documentclass:
That’s all for now folks. Next time I will show you how to make lists, tables and maybe how to import packages and insert graphics to your documents.
The other day someone asked me how far am I planning to go with these tutorials (ie. how in depth are they going to get). I actually don’t know. I guess I’ll see whether or not people like these. If they do, I can try pushing on definitely even after I am out of my comfort zone. In that case we will be all learning something new each time. On the other hand if the LaTeX posts remain dead (ie. no one ever comments on them) I might wrap them up after I show you guys all the basics and reach some good closing point. We shall see.
| Let’s Learn LaTeX | |
|---|---|
| << Prev | Next >> |
Maybe you could add these links to your LaTex reference page. Perhaps in a new section labelled “Tutorials”.
And don’t stop now! These LaTex posts are very informative. Wished I had learned about LaTex while I was still in uni.
Your writing about latex is great! Simple, Comprehensive and if even one word user leaves his messy ship and uses tex, it’s a win :-)
But i also found some fun thing:
latex simpsons. and you can control their eyes…..
http://www.janthor.com/skizzen/index.php?/archives/149-Die-Simpsons-in -Latex.html
there’s a small typo: \noident is missing an “n”.
and I suggest you add a remark that when using \tableofcontents, it might be required to recompile 3 times in worst case to get all numberings correct. This is due to the fact that TeX collects the ToC information in a separate file during compile time, and inserts the “old” file when compiling next time. So the separate files might get out of sync, i.e. page numbers, section numbers etc. might not match.
To be absolutely exact you should recompile over again until the .toc file no longer changes.
For those who don’t like indented paragraphs I can recommend the package parskip (put \usepackage{parskip} in your preamble, i.e. before \begin{document}), which separates paragraphs with a blank line instead of indentation.
Nice post. Have you tried The not so short introduction to LaTeX 2e (CTAN)? It’s one of my favorite tutorials.
Thanks for these writeups.
Though most of my LaTex is generated via Multi-Markdown these days, I appreciate these refreshers…
Keep ’em coming…
Thanks for the tutorials! They’re very helpful, so please keep writing them!
Awesome tutorials!
I just downloaded MacTeX and am slugging through the wikibook on LaTeX… I want to use MacTeX to generate lab reports and low-level research papers. The lab report seems feasible if I can combine excel charts and tables efficiently as well as the occasional diagram. Unfortunately, most of my research papers are required to be in MLA format. This means strict guidelines on the header, a funky opening chunk on the side of the first page, etc. This is easy enough to get in Word, but I can find little to no help in LaTeX tutorials on creating MLA format documents. Any help, guidance, or reference would be a wonderful way to make me another convert.
@ Alex:
Try this. I haven’t tested it but it looks promising.
Thanks for your help, it was just what I needed. I can’t stop using lateX now, I love how easy it is to make a crisp report.
Unfortunately, I’m having trouble inserting Excel things (cell tables and charts), and the only fix I can find (excel2latex) doesn’t work for me. As I’m using OSX and Office for Mac, when I try to open excel2latex, I get the error: The Visual Basic add-in cannot be loaded (Visual Basic add-ins do not work in Office for Mac). I’ve resorted to taking screenshots and including them as images, but it’s not ideal. I guess I could use a virtual machine, but that seems like an unnecessary step.
Any alternate solutions for moving Excel material into a teX document?
Actually if you can get your hands on a copy of Office 2004 excel2latex will work. You see, microsoft “upgraded” their more recent version of Office for Mac by removing VB add-in feature.
Pingback: Let’s Learn LaTex: Part 7 | Terminally Incoherent
