Last week I posted this long winded persuasive article trying to convince you why using a nearly 40 year old text editor is a good idea. I hope by now I have all of you convinced, or at the very least interested. So this post will give you a few pointers how to set it up.
Question the first: where do you get it?
Well, if you are running a real operating system like Linux or OSX then you already have it. Type in vim into terminal and it will pop up. But you probably want the graphical version, don’t you? Well, if you are on Linux you probably have that too – try gvim. If that does not work, search your package repository for gvim or something equivalent. Everyone else, put on your britches and get your sorry ass here:
Was it hard? No? Good. Let’s move on. You should now have vim installed on your system. Now go to your home directory. That’s %USERPROFILE% for windows folks and ~ for everyone else.
Windows people, listen up now – this is for you:
- There is a file in there called _vimrc. Rename it to .vimrc
- Find a folder called vimfiles, rename it to .vim
- Move .vimrc to .vim
- Now open ye olde cmd.exe and do this:
mklink /d vimfiles .vim
mklink _vimrc .vim\.vimrc
Now everyone else listen up:
- Put your .vimrc into your .vim
- Run this:
ln -s .vim/.vimrc .vimrc
Ok, now we are all on the same page. Your .vim should now look like this:
.vim
  |
  +-- .vimrc
  +-- colors
  +-- doc
  +-- plugin
You may have more folders, or less. These are for the most part the important ones. The .vimrc file is where you put most of your configuration. Vim always loads it at start-up. As you can probably imagine, color schemes you can download from the interwebs go into color, plugins go into plugin and etc.. Actually you can put just about anything into the plugin directory. Sometimes it is good idea to take really hairy bits out of your .vimrc and save them as a *.vim file into that directory. But more on that later.
Now, why did I just make you do all that linking gymnastics? Few reasons. For one, it lets me streamline this guide. I can just say “put this in your .vim folder” and I don’t have to put a footnote there that says Windows users should use vimfiles instead.
Mostly though, this bit of work makes your vim configuration portable and platform independent. You can just copy it to any machine you want, issue the mklink or ln commands as shown above and you will have your vim set up exactly as on your other machine. Or better yet, put that folder under source control and just clone it to every new machine.
Section, the second in which we apply maximum snazz to .vimrc
Now that we have preliminary stuff out of the way, let’s start hacking. The default settings in vim are ok, but you can make it much easier to work, and much more powerful with just a few entries in your .vimrc. Most vim bundles come pre-configured but for the sake of this guide I will assume yours is mostly blank.
Let’s open your .vimrc and start pasting useful stuff:
" break compatibility with vi
set nocompatible
First thing you want to do is to tell vim “No, I don’t want you to pretend you are vi. Be yo’ own self damn it!”. In other words, this is your ‘turn of legacy-mode’ button. Use it.
" buffers can exist in background
set hidden
This will prevent vim from complaining about buffers not being saved, and generally save you a lot of headaches.
"enable inline spellcheck
set spell
set spelllang=en
This is optional, but personally I can’t live without an inline spellcheck. If your are using gvim or MacVim then it will work as just about any editor – you can right click on a word to select a replacement. Though you probably will want to learn this shortcut: z = from the keyboard. It is usually much faster than mousing it up.
Here is how spell checking looks in vim:
I’m using the right-click contents menu on the word “inline” and z= shortcut on the word “spellcheck”.
" enable line numbers
set nu

" show line and column markers
set cursorline
set cursorcolumn
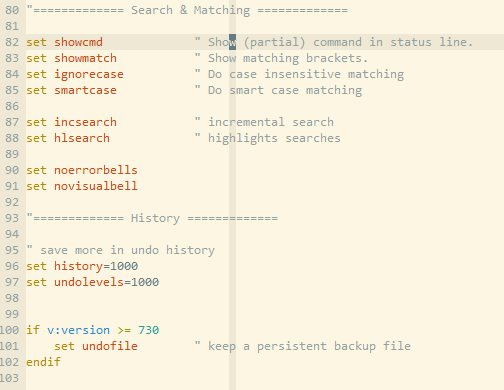
The cursorline and cursorcolumn options are my personal preference – it basically looks like this:
Note the cross effect in the middle of the screen? I find it very helpful in finding my place, or when aligning blocks of code.
" enable soft word wrap
set formatoptions=l
set lbr
This is useful when writing prose. It will word-wrap long lines just the way a regular editor would do. If you are coding, this is not as helpful – but I personally use vim for most text editing so I keep it on.
Small side effect of this setting is that vim will not recognize “screen lines” but still move around using real lines. In other word, if you hit j to move to the next line, it will skip down past the real newline mark, skipping all the soft word-wrap marks. When writing prose, it usually means that j effectively becomes a “skip to next paragraph” button which is not really what you want. So you do this:
" move by screen lines, not by real lines - great for creative writing
nnoremap j gj
nnoremap k gk

" also in visual mode
vnoremap j gj
vnoremap k gk
Now j and k will behave the way you would expect them to. Now stuff useful for coding:
syntax on
filetype on
filetype indent on
filetype plugin on
filetype plugin indent on

set autoindent
" copy previous indent on enter
set copyindent
set smartindent
This ensures that vim will always use colored highlights for file types it can recognize, and for those you installed plugins for. It also turns on auto-indenting which is helpful 90% of the time. Except when you are pasting in a block of text. Then it has tendency to fuck things up about 30% of the time. If that happens, there is a trick you can use:
" toggle paste mode (to paste properly indented text)
nnoremap  :set invpaste paste?
set pastetoggle=
set showmode
Now you can hit F2 to temporarily suspend auto-indenting and paste a block of code properly. Then hit F2 again to toggle it back to the default settings.
set showcmd		" Show (partial) command in status line.
set showmatch		" Show matching brackets.
set ignorecase		" Do case insensitive matching
set smartcase		" Do smart case matching

set incsearch		" incremental search
set hlsearch		" highlights searches
These should be fairly self explanatory. Here is a little caveat: when you turn on highlight search, and search for something there is no easy way to turn the highlights off other than searching for something that is just not in the file. Some time ago, I found this nifty trick somewhere online:
" pressing \ clears the search highlights
nmap   :nohlsearch
It lets you hit the leader key (by default \) and enter to quickly and effectively clear search highlights out of the file.
set noswapfile
set nobackup
set nowb
By default vim will clutter your directories with swap files and backup files. Once upon a time, this was probably a great idea. Especially when Billy Joy was using vim to edit remote files over undreliable 300 Boud connection. Having vim save a clean version of a file each time you opened it was probably a life saver. Nowadays though it just introduces a lot of clutter into your directory structure. I always turn it off.
Here are two really a nifty trick I have discovered in my travels:
Esc is really, really far off the home row. You don’t really want to use it. Most people know that a faster way of exiting insert mode is Ctrl+]. But you can do better:
" use jj to quickly escape to normal mode while typing
inoremap jj
This puts the escape on the home row. Tapping j twice in a row kicks you back into normal mode. Which is great because most of the time after editing something you probably want to go down in the file anyway. And there are no English words, and precious little of programming keywords that start with a double j. It’s a key combination you almost never type. And it saves you a lot of key strokes or hand movements.
Second tip: remap ; to mean : in normal mode. Vim uses ; to let your repeat t and f commands which might be useful, but honestly – how often do you need to do that? Compare that to how often you type in : (all the time – to save, to exit, to switch buffers, etc..). So it is a good tradeoff:
" press ; to issue commands in normal mode (no more shift holding)
nnoremap ; :
Over the course of a week it will save you hundreds of keystrokes and will make saving your file much faster and comfortable on your fingers.
Final tip: make your status line meaningful. I use this snippet with a few slight modifications:
" Statusline (c) Winterdom
" http://winterdom.com/2007/06/vimstatusline

set ls=2 " Always show status line
if has('statusline')
   " Status line detail:
   " %f     file path
   " %y     file type between braces (if defined)
   " %([%R%M]%)   read-only, modified and modifiable flags between braces
   " %{'!'[&ff=='default_file_format']}
   "        shows a '!' if the file format is not the platform
   "        default
   " %{'$'[!&list]}  shows a '*' if in list mode
   " %{'~'[&pm=='']} shows a '~' if in patchmode
   " (%{synIDattr(synID(line('.'),col('.'),0),'name')})
   "        only for debug : display the current syntax item name
   " %=     right-align following items
   " #%n    buffer number
   " %l/%L,%c%V   line number, total number of lines, and column number
   function SetStatusLineStyle()
      if &stl == '' || &stl =~ 'synID'
         let &stl="%f %y%([%R%M]%)%{'!'[&ff=='".&ff."']}%{'$'[!&list]}%{'~'[&pm=='']}%=buff: #%n line:%l/%L col:%c%V "
      else
         let &stl="%f %y%([%R%M]%)%{'!'[&ff=='".&ff."']}%{'$'[!&list]} (%{synIDattr(synID(line('.'),col('.'),0),'name')})%=buff:#%n line:%l/%L col%c%V "
      endif
   endfunc
   " Switch between the normal and vim-debug modes in the status line
   nmap _ds :call SetStatusLineStyle()
   call SetStatusLineStyle()
   " Window title
   if has('title')
      set titlestring=%t%(\ [%R%M]%)
   endif
endif
It gives you nice, informative status line like this:
It gives me the file name, the buffer number, current line, total lines in file as well as current column number. All useful information.
To avoid cluttering my .vimrc I put it in a file of it’s own, called it statusline.vim and placed it in my .vim/plugins directory. By the way, that’s more or less how you make a vim plugin. Don’t tell anyone it’s that easy, they will all want to do it.
Actually, if you want Pathogen compatible version you can grab it from here.
“Plug it in, plug it in” or how to use plugins for fun and profit
Let’s talk plugins. By default plugins go into plugin directory, their documentation goes into the doc directory and etc. So to add the AutoClose plugin which I will talk about in just a second, you would have to add it like this:
.vim
  |
  +-- .vimrc
  +-- colors
  +-- doc
  |    |
  |    +-- AutoClose.txt
  |
  +-- plugin
       |
       +-- AutoClose.vim
This is messy and stupid, and we are not going to do that. It’s find for one or two plugins, but imagine you have 20. Imagine trying to delete or update them. It becomes a mess really quickly. We are going to use Pathogen – an extra awesome plugin management plugin that will let us keep the files for each plugin in it’s own folder.
Go and download pathogen.vim from Github and put it into your .vim/autoload directory (if it does not exist, create it). Now add this to your .vimrc:
call pathogen#infect()
Now create a directory called bundle. From now on, when you find a plugin you like on Github you just clone in to that directory. So after installing the AutoClose plugin your .vim will look like this:
.vim
  |
  +-- .vimrc
  +-- autoload
  |    |
  |    +-- pathogen.vim
  |
  +-- bundle
  |    |
  |    +-- vim-autoclose
  |          |
  |          +-- doc
  |          |   |
  |          |   + -- AutoClose.txt
  |          |
  |          +-- plugin
  |               |
  |               +-- AutoClose.vim
  +-- colors
  +-- doc
  +-- plugin
That’s much, much cleaner, isn’t it?
How does this AutoClose plugin work? Let me show you:
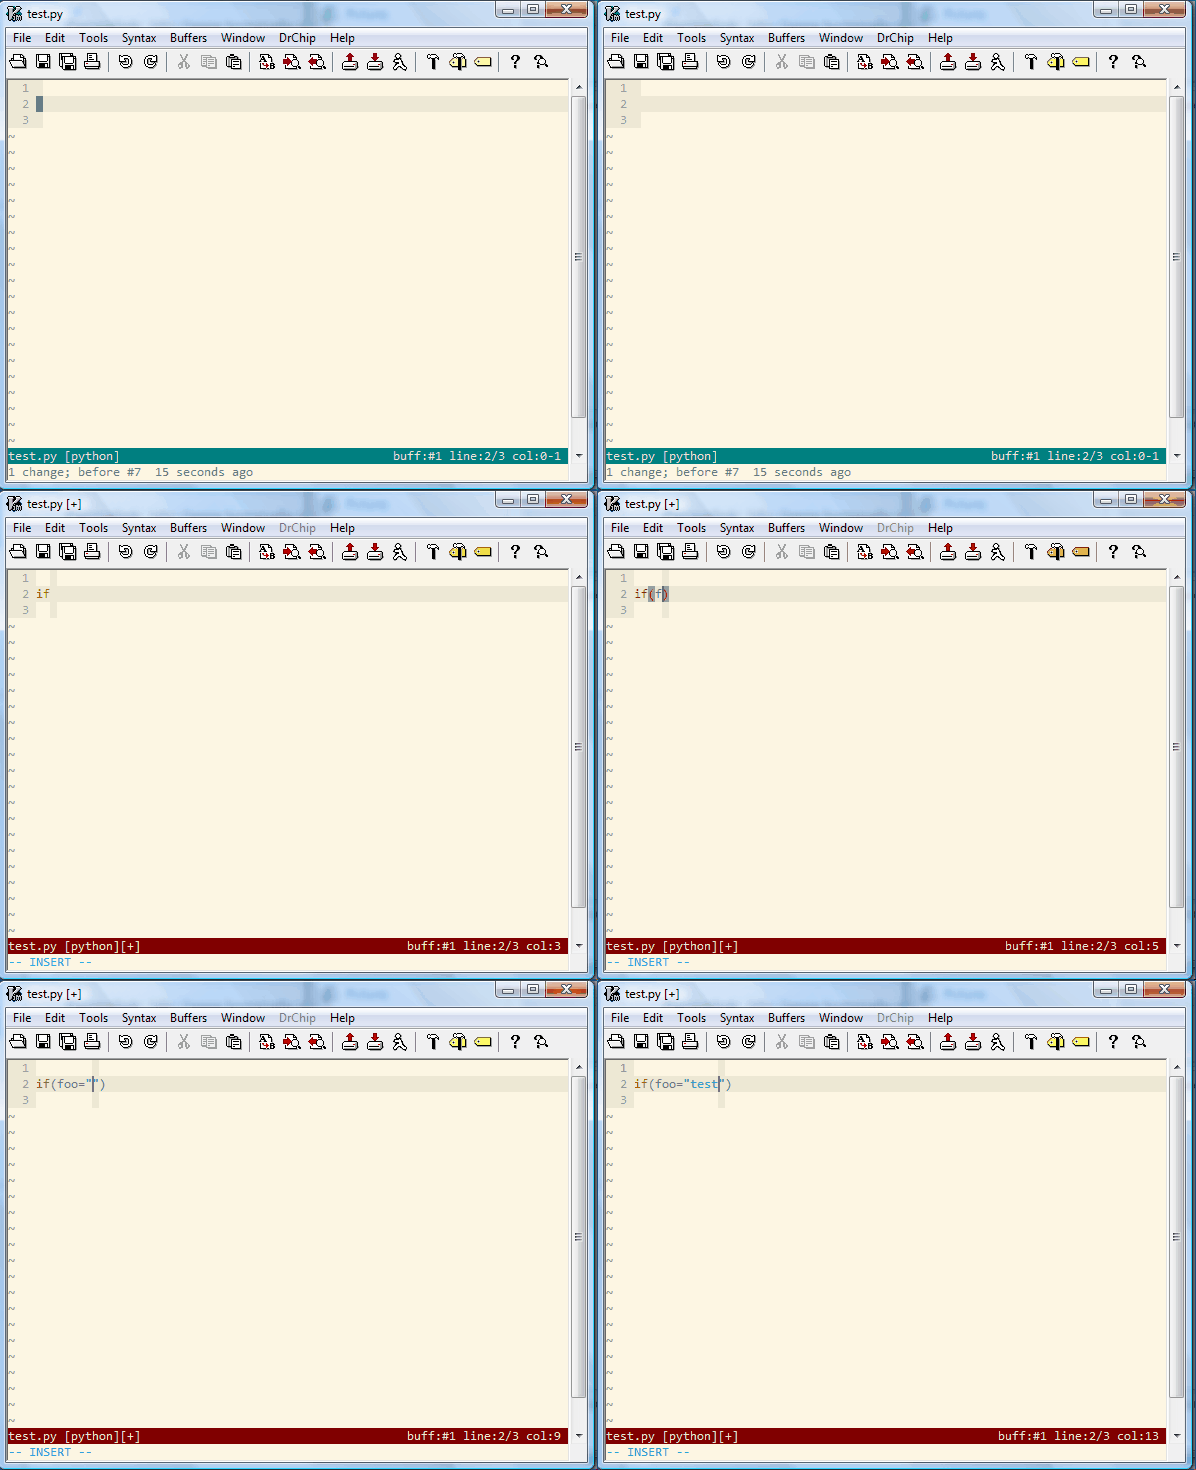
AutoClose essentally “closes” brackets and parentheses for you. You will notice that as I type “(” a matching “)” just appears there. No this is not an artifact of shitty gif capture. It’s a plugin. Personally I love it – it saves me a ton of keystrokes… Escept those times when I try to write comments in vimrc, and it insists on adding quotation marks for me.
The second plugin shown in this gif plugin is ObviousMode. It’s function is to make it painfully obvious what mode you are in at any given time. To wit, you will notice that my status line changes to red (“Sanger Danger” color) when I enter insert mode. It turns teal when I am editing an unsaved file, and goes gray once I save it. In my book, this is best thing since sliced potato.
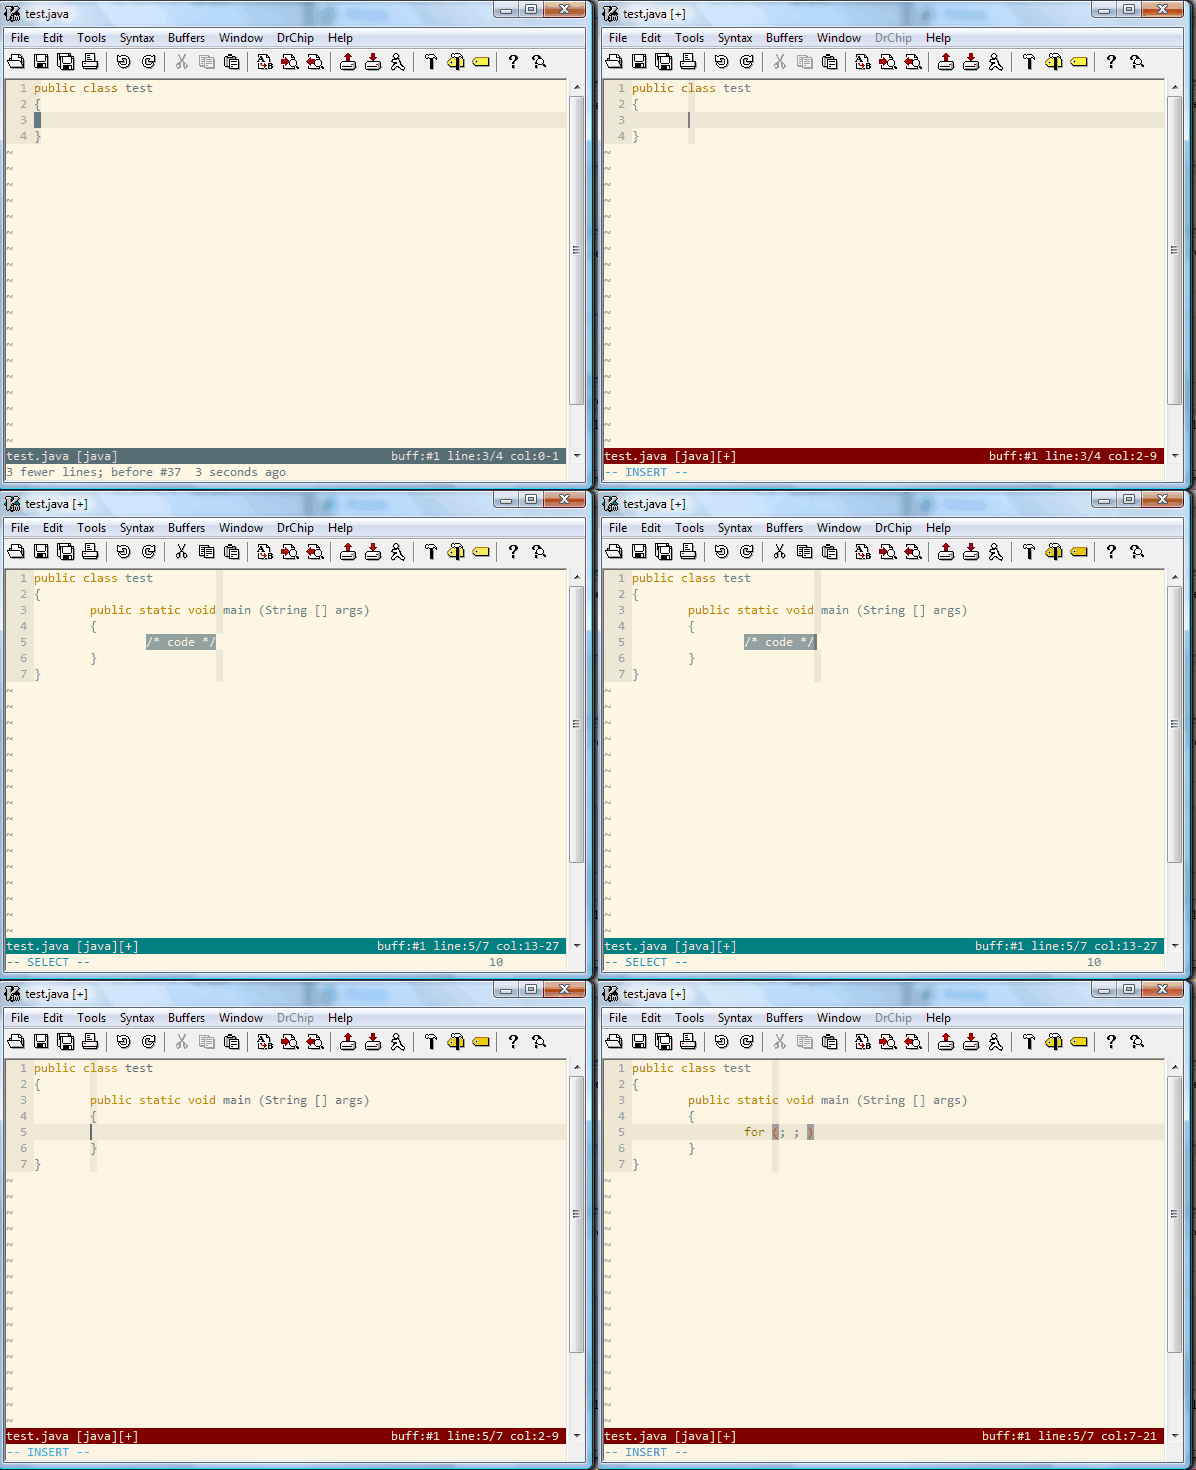
Here is another great plugin: SnipMate:
It essentially duplicates the Code Snippets functionality from TextMate in your vim. In the example above you can see me type in the word “main”, then I hit Tab, and SnipMate inserts all the boilerplate for me. Similarly, I type in “for”, hit Tab, and SnipMate gives me a skeletal version of for loop. Snippets are file-type specific, and the plugin ships with a whole load of them. You can add your own if you wish.
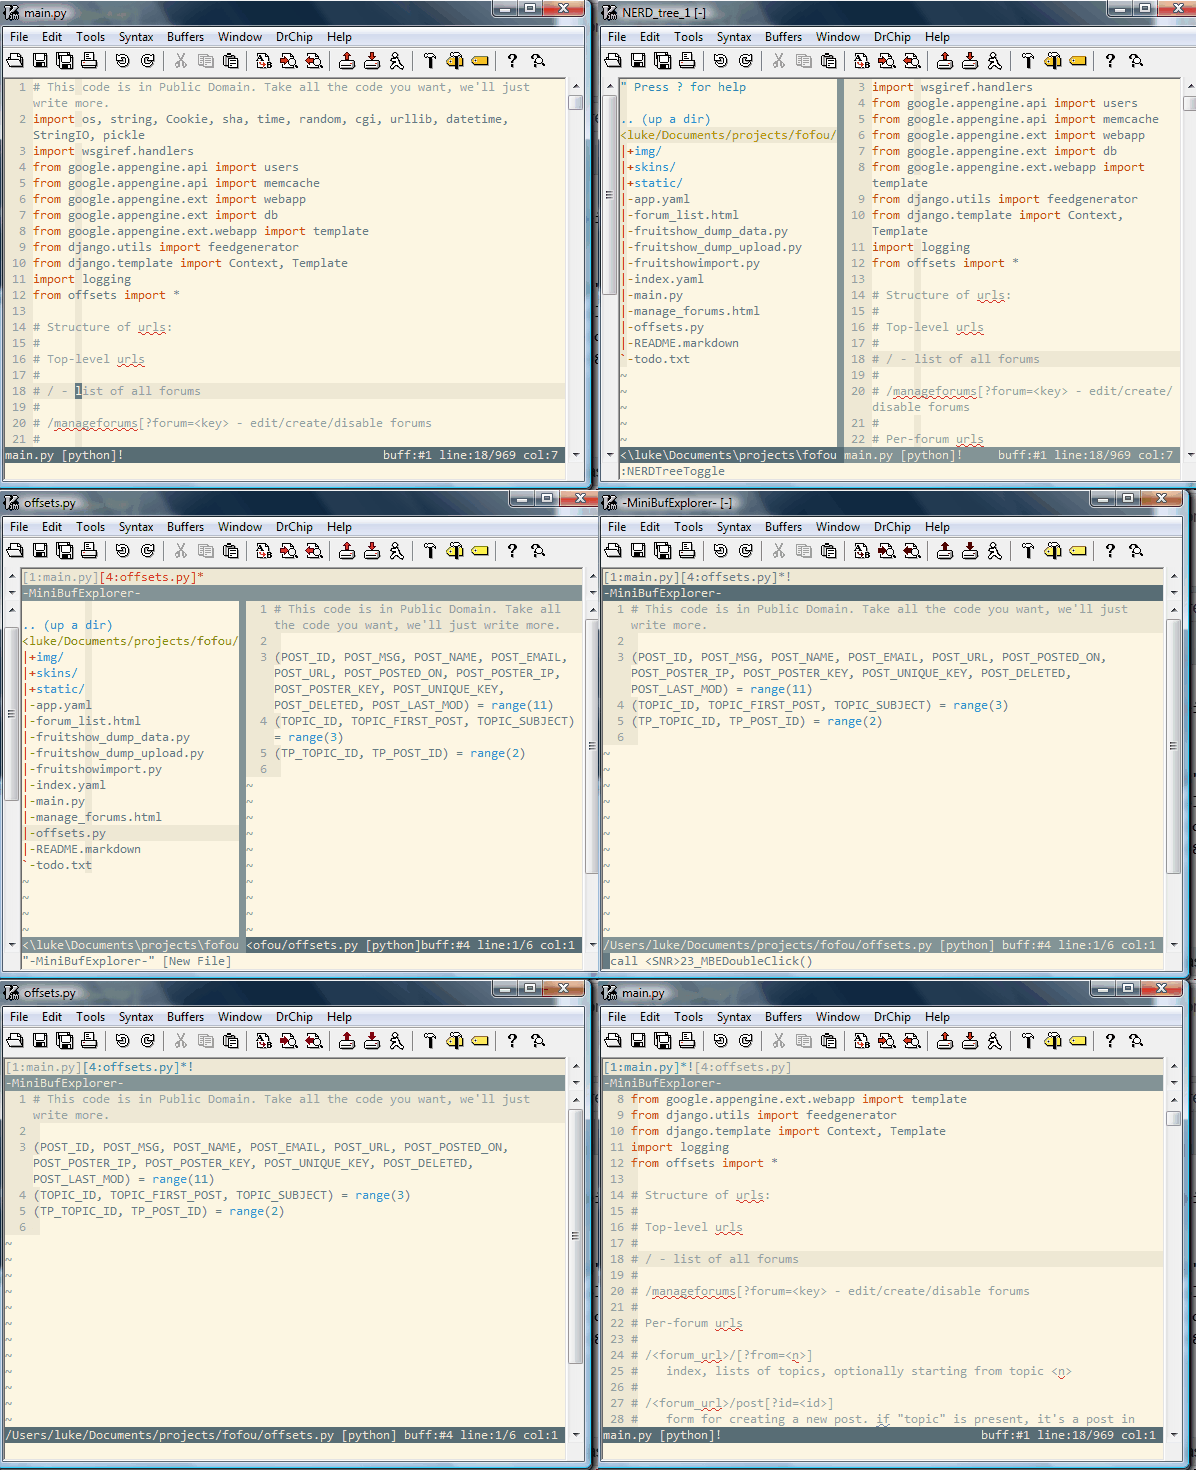
Here are two other really useful plugins that I find myself using all the time:
The first one is NerdTree. It gives you that nifty little side-bar file explorer tree. Some people do not like it, but I personally find it quite useful. Yes, typing in partial file-name and hitting Tab is usually faster, but sometimes I don’t remember what I’m looking for. Some of my projects have deeply nested folder trees and I don’t exactly remember where things are, so NerdTree becomes indespensible. I have it bound to my F1 key:
nnoremap :NERDTreeToggle
The second plugin you can see popping into the action when I open a file via NerdTree. It puts a tiny “tab strip” on the top of the editor window which lists the open buffers. Normally, the only way to see what buffers you have open is to issue the :ls command. With MiniBuffExpl you get a nifty clickable tab like interface.
What I just shown you here is pretty much all I use. Vim is extremely powerful on its own, and it is a good idea to learn the basics before going all out installing plugins. The thing about plugins is that while they add a lot of functionality to the editor, they also can completely alter it’s behavior. Which is fine, but at some point you are no longer using vim. You are using some sort of a different mutant editor that is probably more powerful in some ways, but crippled in others.
Colors, I forgot to talk about them colors!
Oh, you probably noticed your vim it is nowhere near as pretty as mine. Don’t fret. I simply happen to use a color theme called Solarized. Guess where you put the color files inside your .vim folder? I will let you figure this out on your own. Install it, and welcome to the world of pretty. You are welcome.
Most color schemes (like Solarized here) are compatible with Pathogen so you can just clone them into the bundle directory like any other plugin.
Vim’s biggest open secret that will increase your awesome by at least 67%
Finally, here is a bit of advice that you don’t usually see in beginner Vim n00btorials like this one. This is something you will thank me for, because it makes vim behave like a motherfucking IDE. Here it is – pay attention because I will only say it once:
USE CTAGS
Vim has a nifty little key combination Ctrl+] which is supposed to jump to the definition of whatever you happen to have under your cursor. Only it never works. Every time you hit it, it says that a “tag” was not found.
Here is how you make that button work. There is a nifty application out there called Exuberant CTAGS. The name suggests it is only for C programmers, but it is not. It supports over 41 languages including PHP, Perl, Ruby, Python, Lua, Javascript and more. Your mission, should you choose to accept it is to download it right now, and stick it somewhere in your path. On linux you might already have it, and if not you can usually get it via your package manager. On Ubuntu for example you just install exuberant-ctags:
apt-get install exuberant-ctags
This will install and replace the basic system ctags that you have installed by default. On a Mac…
Ok, this is a bit for Mac users – everyone else, skip the shit out of this paragraph and move on. Mac users – your computer already comes with ctags, but it’s a crappy version. What you want to do is get Homebrew (you should already have it) and install the good version like so:
brew install ctags
Now you have two versions of ctags on your system, and the crappy one happens to be the default. So put this in your .bashrc:
alias ctags="`brew --prefix`/bin/ctags"
Now you should be good. Note that if you even need to use the original system version of ctags just run /bin/ctags or comment out this alias and you are back in business.
Ok, we should be all on the same page now. Ctags is installed and in your path. Now open some file from your favorite project in vim and do this:
:!ctags -R
Now put your cursor on a class or method name in your source and hit Ctrl+] shortcut again. You should be immediately taken to the file where it was defined. It’s like magic!
You will notice a file named tags somewhere in the project root. You can open and inspect it – this is how vim makes the magic happen. That file basically maps important names to files and lets you jump around your source like you are using an IDE. You just need to remember to periodically run this command as you build out your code. Best bind it to some key:
nnoremap :!ctags -R
Hit that thing often, and your experience should be as smooth as a baboon’s buttox. This is by far the best advice I can give you here – this is one of vim’s most useful, and least used and least discussed features. I use it for my PHP code all the time, and it works great.
If you like all of these tweaks I have shown you, bit you are lazy you can just use my vim config. I have it under source control on GitHub so you can easily clone it from here.


http://weknowmemes.com/wp-content/uploads/2011/12/mother-of-god-meme.j pg
@ Andrew Zimmerman:
Not sure if approval or disapproval. :P
I ran into the “stop highlighting please, I’m quite DONE searching” problem too. Alternate solution: from normal mode type
:nohand hit enter.Nice guide. Even though it doesn’t help me much, I can link others to it :)
Small correction: when you talking about nohlsearch, you say “hit the leader key (by default \) and enter” but the mapping maps to leader+space.
Ok—bad question, but I’m new to git so—I’m having trouble cloning a repo into my bundle directory:
~/.vim/bundle$git clone git://github.com/maciakl/vim-neatstatus.gitCloning into 'vim-neatstatus'...
fatal: unable to connect to github.com:
github.com[0: 207.97.227.239]: errno=Operation timed out
Do you know of a generic reason that this would happen? I’m connected to the internet over a strong wifi connection. This happens with every repo I try to clone here. Any suggestions are welcome.
@ Alex Reinisch:
Actually, never mind – disregard last answer. I should actually read comments before hitting “reply”. :P
Yes, this is a firewall issue. I get this at work all the time because we block outbound connections on all ports except 80 and 443. So to use git, you just need to clone via https.
Here is how you want to clone it:
Note the https instead of git.
Thanks! Makes sense and it worked—double win. Time to clone ALL THE REPOS!!!
// ctags isn’t working for me.. in a weird way. I’m on mac, so I downloaded through homebrew, and added your offered alias in my
~/.profile. When I run the command in vim, it cries “illegal option!”::!ctags -Rctags: illegal option -- R
usage: ctags [-BFadtuwvx] [-f tagsfile] file ...
Did you post a typo? Or did I somehow get a bad ctags or what? Thoughts?
@ Alex Reinisch:
You need to either completely close and reopen Terminal app (like Command+Q close) or run this to reload your profile:
Bash won’t know about the stuff you just added to .profile unless one of these things happens. :)
First I was all, pshaaaw, I do mostly AutoCAD so I wouldn’t be able to give up a mouse most of the time anyway, so why bother learning a new text editor… then you showed the auto-close feature… damnit. :P
I guess I have something to do next time I’m bored.
Thank you so much.
I only realize now (and I’ve been using vi(m) since 1995) how much I missed your fantastic ‘jj tip‘.
Now I can’ throw away my capslock reconfiguration, you gave me THE solution.
Great tips! Thanks for sharing. I’ve been using vim (poorly) for a long time – lots of good information here, as well as the tips to install the Solarized color scheme; it’s a nice change from my old favorite ir_black.
@ Luke Maciak: Sorry, but the princess is in another castle. Is it possible you have an old ctags? Is it possible the alias isn’t right? Should I just try harder? Knowing that I’m at least 67% less awesome than I could be is a real strain on my life.
@ Alex Reinisch:
Ok, try the following:
For me, it lists two locations:
/usr/bin/ctags is the Mac version
/usr/local/bin/ctags is the Homewbrew version
Try running it from the second location:
If that works, then alias that to ctags. :)
I like the symlink trick with config files. Unbelievably, I had not thought to do that until now.
I don’t like remapping commonly used keys through because then I build a muscle memory which isn’t transferable to other machines which don’t have my settings.
Nice post!
Cursorline/cursorcolumn are now in my .vimrc with couple of remaps, example jj to escape.
Thank you for this post :)