When you first start to play Mincraft it may be a bit overwhelming and confusing, seeing how the game has no real tutorial or hint system. It is very old school in that aspect – you have to either experiment a lot and try to discover crafting combinations via trial and error or look them up on the wiki page. But that’s not the worst of it. Worst part is that pretty much everyone new to the game does the same thing first: they leave their spawn point, and wander off into some distant corner of the map, start mining, building and crafting experiments only to be caught by surprise creeper explosion, or a night time zombie attack.
Then they respawn at the un-protected spawn point, with no clue how to get back and pick up their dropped items, and no nearby shelter and weapons to protect themselves from roaming monsters. This is exactly what happened to me. During my first game I was essentially corpse camped by a stupid zombie and a skeleton tag team and when I finally killed them with bare fisticuffs and some sunlight I realized I had no clue how to get back to my half-finished house and my items. And while searching for them, I got hopelessly lost again.
So I figured that I write up a short survival guide that will help newbies not to get repeatedly ganked. And it may give those of you who prefer to dwell under rocks and only emerge to read my blog a better overview of the game and the awesome crafting mechanics. I know that there are many guides like this out there, but this one is mine.
Since this is going to be a very pic intensive post, I’m posting the rest after the cutoff.
The first cardinal rule of Minecraft is not to talk about Minecraft wander away from your spawn point at the start of the game. It’s important to remember where your spawn point is, so that you can then find your way back to your possessions and whatever you were building or mining when you died.
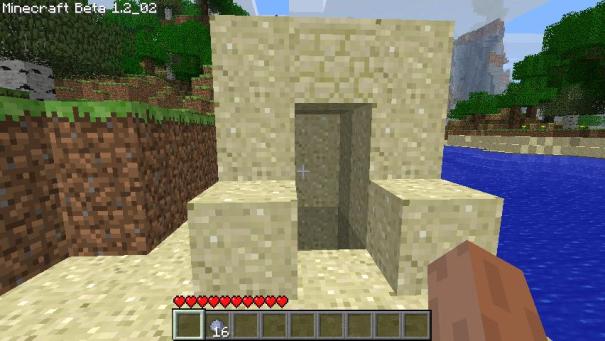
So as a rule, I always mark my spawn point when I start a new game. The block you are standing on when you start is the same block you will spawn on after you die. So dig it out, and stack some blocks around it. For example, here i spawned on the beach, so I built a little sand structure around my spawning square:
Your structure does not need to be as elaborate. You can just stack a few blocks on top of each other and call it a day. I built it up like this for two reasons:
- It is difficult to miss it. if I wander away foraging for resources, I will usually be able to locate my spawn point fairly quickly just by glancing around. If i just stacked two blocks next to it, I could easily lose sight of it or get turned around. My structure not only is impossible to mistake for a natural formation, but it also conveys additional information – like the direction in which I will be looking where I spawn.
- This structure is actually a beginning of a spawn bunker. Ideally you want to spawn inside a closed structure with an enclosed light source which will prevent zombies from spawning inside. This will eliminate the the problem of being corpse camped by monsters, and also allows you to put a chest with some emergency resources right where you spawn. You don’t have to brave a night time corpse run, or try to sneak your way back to the house. You can just grab a spare sword and armor and go get revenge.
Here is an example of a finished spawn bunker from another game:
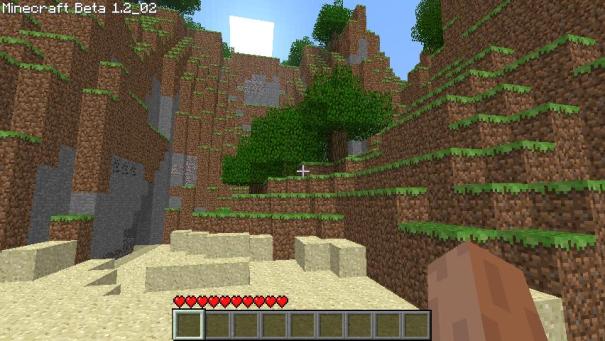
But we are getting ahead of ourselves. Once you build a simple spawn marker the first order of business is to locate the closest tree and get some wood. In the game I started specifically for the purpose of this post I got lucky and spawned right next to a clutch of trees and a stone wall with some coal ore, giving me quick and easy access to all the starting resources I would need:
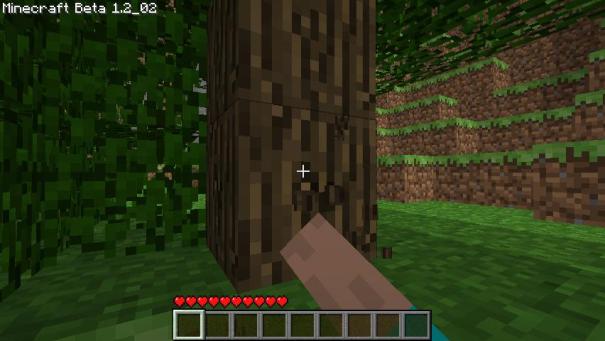
Just like sand and dirt, wood is fairly easy to chop down with your bare hands, but it goes much, much faster if you use and axe. Since we don’t have one yet, we will use your blocky paw:
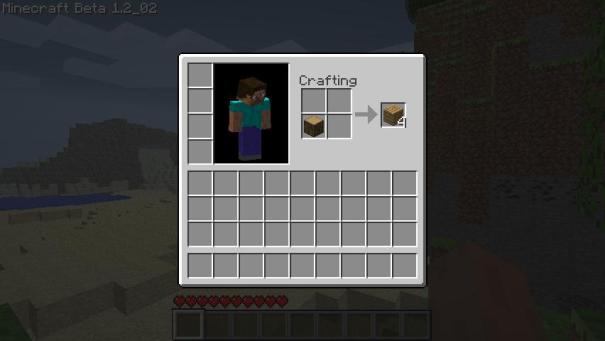
Once you collect a single block of wood, open up your inventory by pressing “i” and drop it on the 2×2 crafting square like this to make 4 wooden planks:
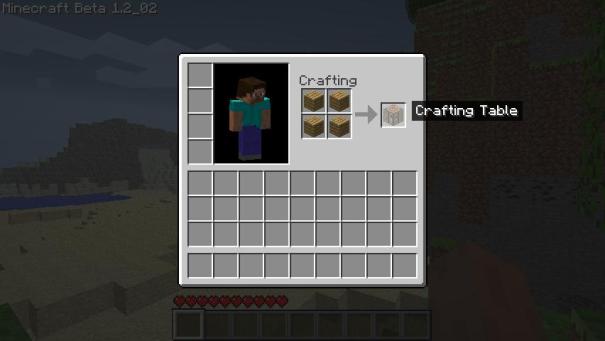
Next, take the wooden planks you just made and arrange them in a square to make a Crafting Table. The table will give you access to a 3×3 grid which is used for all of the advanced recipes.
Now that you have a table, place it in the bottom row of your inventory which will make it available from your inventory strip on the bottom of the screen. You can scroll through the items with your mouse wheel, and place them with the RMB. You should keep in mind that the table is portable. Hitting it repeatedly will make it pop back into an inventory item form allowing you to pick it up and move it somewhere else. So just drop it down anywhere:
You will need a few more blocks of wood, so chop one or two more blocks and turn them into planks. You can turn your wooden planks into sticks by arranging them one on top of the other anywhere on the grid. In fact you can do this in your 2×2 inventory grid, but here I’m using the crafting table:
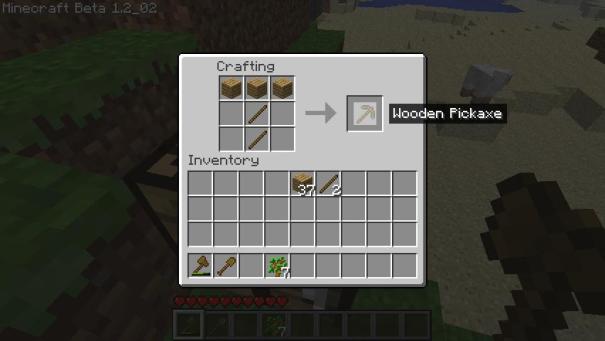
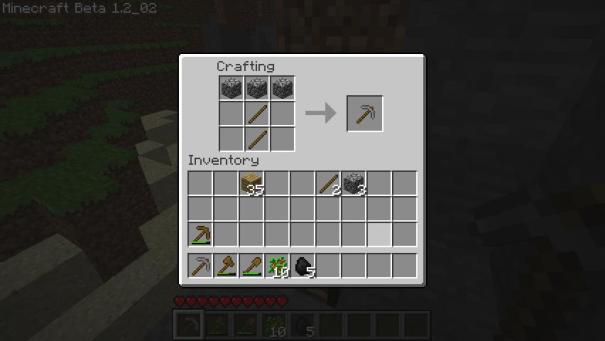
We need at least 4 sticks and 6 wooden planks so plan accordingly. Once you have all of that, it’s time to make some tools. I propose making a wooden pick because we will want to do some mining first. Stone can be broken down by hand, but using a pickaxe makes things much faster. To make one, left click on the crafting table to open the 3×3 grid and arrange two sticks and 3 wooden planks in a T shape like this:
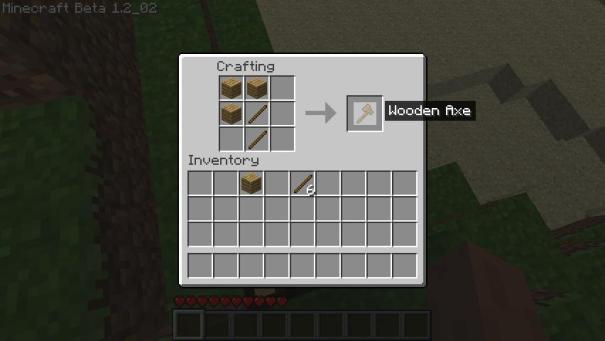
You can also make a wood chopping axe by arranging sticks and planks in a lower case q shape like this:
Or you could just wait until you have some stone. Stone tools are more effective and more durable, so you will want to replace the wooden tools as soon as possible.
As I mentioned before I got very lucky and spawned right next to some coal ore – it’s the black spotted rock in this picture. You probably want to look for a similar rock formation. If you can’t don’t sweat – we can make some by burning wood in a furnace later.
Use the pickaxe to break down the coal ore and the stone around it. As soon as you get 3 blocks of cobblestone in your inventory make yourself a stone pickaxe. It will make mining much faster.
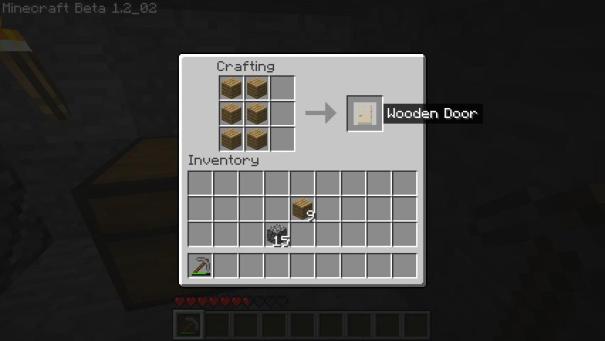
By the time you do all of this, the sun is probably low on the horizon so you need to think about a shelter and some source of light. You could use your spawn bunker to spend the night, but that’s probably your last resort. What you really want to do is to build yourself a little niche in the very rock you were mining. This way you will be able to continue mining even after the sun sets. Once you have a nicely sized hole in the wall, seal it all up, leaving a small entry hole one block wide and two high. Then make a door:
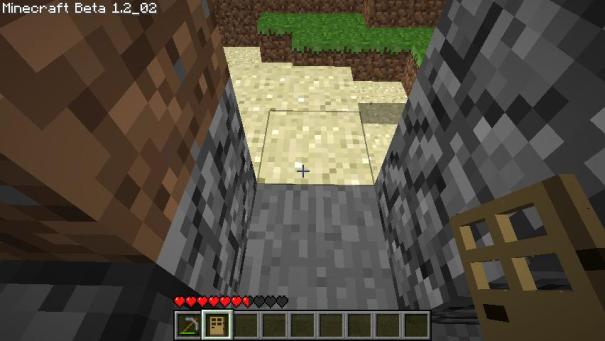
Doors are very nice. They keep monsters outside, but allow you in an out and can be opened/closed by clicking on them. You can place the door just like any other block. Try to aim outside of the block you want to enclose like this:
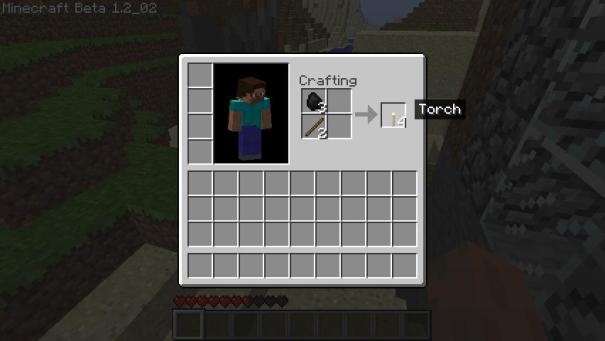
Now all we need is a source of light. Monsters don’t spawn in well lit places so you want to make sure there is some light in your house, in your spawn bunker and in any underground location where you are going to be mining. If you found coal by now, you can easily make torches by combining it with sticks like this:
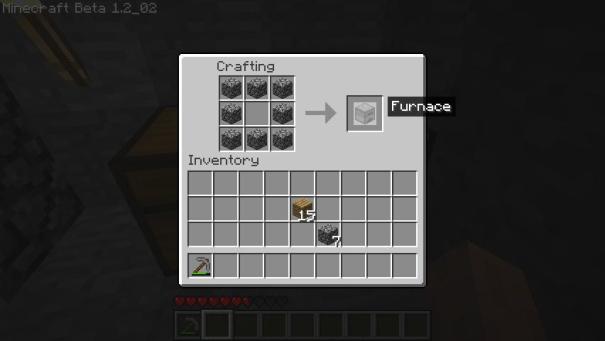
If you haven’t found any, you will need to make some charcoal instead. First build yourself a furnace from stone:
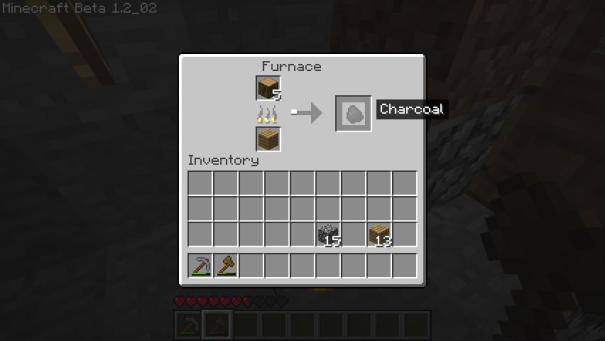
Now use it to make charcoal: use wood as your ingredient and planks or more wood as fuel:
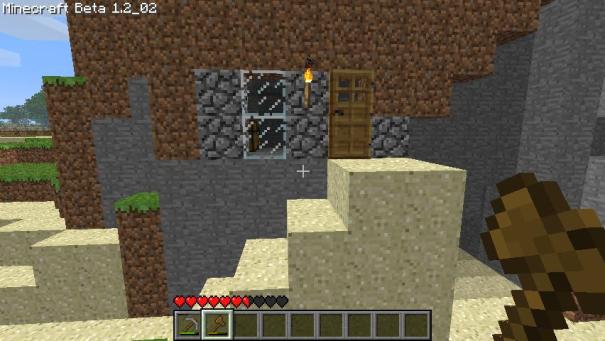
In Minecraft charcoal has the exact same properties as coal, so you can use it to build torches as described above. Now slap the torches around on the walls and you should be set. for the night. When all is said and done, your house might look a bit like this from the outside:
Note that this is the same wall which I showed you originally with the coal ore. As you probably noticed, my little house has a window. You can make the glass I used to create it by melting sand in the furnace.
Now, all that is left is to wait for sundown. Barricade yourself in your house, and kill time by expanding it by digging into the rock. If you are lucky you will find some iron ore, or maybe and underground dungeon with some treasure chests and/or gold and diamond ore deposits.
This is how I start most of my games now. It seems to be the most efficient and effective way to start. From here though, it is all up to you and your imagination. The only other good tip I can give you is to build a navigational landmark of some sort before you go exploring. Preferably a really, really tall tower with some torches or burning wood on top. When leave the vicinity of your spawn point, simply try to keep the tower visible and you won’t have problems coming back. If you are embarking on a really long trip, build way-point towers along your way to avoid getting lost.
Do you have any good Minecraft tips and tricks to share? Please post them in the comments.




I tend to just turn my spawn-point shelter into a dugout base – expand downward and inland (you always spawn on sand, which tends to mean coastline) until I hit stone and start mining from there.
First world, I did exactly what you described and ran off to an interesting looking mountain to make my base… from then on, any time I died I had to run a gauntlet of monsters to get back home.
I think the easiest way to get started is to just watch the first couple episodes of a good Let’s Play series. These are my two favorite series, though their “pilot” episodes are a bit outdated at this point,
* X’s Adventures in Minecraft — It’s 10 hours long in total, and finished. It gets very exciting towards the end of the series.
* Coe’s Quest — 30 hours long, and ongoing. This one can get a bit dry, but he does some really cool things. Episodes 51-55 are probably my favorite, showing the original, scarier Nether that no longer exists.
I’ve seriously spent more time watching people play Minecraft than I have playing it myself.
As for tips and tricks… spiral staircases are an excellent way of digging really deep down – pick a central column then go down by one block every time you go 1 around the column, removing at least 3 blocks (the 2 in front of you and one down) but at some point you’ll want to go back and take out a 4th from the ceiling so you don’t knock your head as you jump up the stairs.
I’m a bit of a mine-rat – tend to only come out on the surface during daylight, to gather wood for more pickaxes/torches. The best stuff can be found by going down ‘n down until you hit bedrock, then counting up about 10 steps. That said, if you don’t like digging blind, there’s a variety of fine mapping programs to show you what’s in the ground, one layer at a time. Good for finding elusive diamonds.
Or there’s the approach I went for on my second world, of building expanding concentric rings of walls to keep the monsters out, and carpeting everywhere outside of them (eventually up to about a 100 block radius) with enough torches to stop anything spawning.
Walls want to be 3 blocks high, and have a lip around the outside edge (like an L shaped tetris piece, turned pointy-end down and facing outwards). The lip is to keep spiders out now that they can climb walls. Single-block windows are ok, but only in flat faces of wall – if you take a block out on a diagonal you get a sqrt(2) wide hole, which spiders can get in through. Unless you glass it over of course, but then you can’t hit things through the window.
Once you’re all set up, have a project – visit the nether, set up a minecart railway or a mob trap, build 1:1 replicas of 8bit video game sprites using blocks as pixels; you need something to occupy yourself other than the struggle for survival, because survival ceases to be a struggle after the first little while.
Oh, and I also forgot to mention a really, really fantastic series by The Yogscast. It’s not very informational (these guys, many hours later, are still pretty bad at the game), but they are hilarious and have a great chemistry going on between them.
Their Let’s Play takes an epic turn starting around episode 22. I’m not using “epic” in a casual way here. Seriously, I think you’d really like where they go with the series. They have a few hundred thousand people tuning in each episode, so you know it has to be interesting.
I don’t care about actual mining as much as I do just making my castle look awesome. Last time I made a 4 layered castle that extended under ice.
|__|__|___|__…….___|__|___|__|
——————-/””””””\——————–
——————_________________—–
—_____*_____________*_________/
\________*____________*_________
Thats basically what mine looked like all the |s are 10 layer tall walls which ringed the entire ice base. then the …… was the ice that went over my base. then it expanded downwards and they would extend over really far… and then I would make a small downwards staircase so I was only 2ish layers further down then went the other direction.
then the *s were staircases that went straight to the bottom they all met down at the bottom for one giant (I am talking GIANT) room.
Unfortunately… my hard drive crashed. :( I don’t even have the links to my screen shots. Just trust me it was beautiful.
Tip?
Either you go and chop some wood until you think you’ve got enough for whatever you want to do or you write an excel sheet that tells you how much raw wood you need. Quite easy and helps fill time at work :I
When you go adventuring take the following:
– 64 torches
– 64 raw wood
– 64 sticks
– 64 (char)coal
– extra tools (pick, axe, shovel)
– no extra weapons (store these at your expeditions starting point in case you get killed and need to beat some zombies to get your stuff back)
– best armor you can get at that time
– crafting table (speaking of which: wasn’t it a right click to use it?)
When you want to go mining you should take a load of stairs with you (makes travel up easier/faster).
And build your house in LoS of your spawn point with some extra entrances.
My mountain top home has three extra doors leading to the mines stairwell below the house. All marked with torches above the door to be easily spotted in the night.
So even if I get swamped by zombies or blown up by creepers: no problem getting back home :)
Great intro, I finally got round to playing minecraft about a week ago and it is already stealing my life away from me.
You should always place doors from the outside though, that way you can fire out, but mobs can’t fire inwards.