In Part 4, I mentioned the Codeception test framework, but didn’t really get to use it because their page temporarily went down and I didn’t feel like trying to hunt down the documentation from third party sources. That outage seemed only to last about an hour, but by that time I was already finished with my post. Besides, it gives me more stuff to talk about today.
You can install codeception via Pear like so:
sudo aptitude install php5-curl
sudo pear channel-discover codeception.com/pear
pear install codeception/Codeception
Note that it users the curl feature of PHP and hence I added that there as a prerequisite. This will make codeception available under the command codecept. Now that we have it installed globally, we have to bootstrap the test environment in our project folder:
cd /vagrant/www
codecept bootstrap
codecept build
This will create a tests folder and generate a lot of garbage inside. A clean test folder after issuing the bootstrap command usually looks like this:
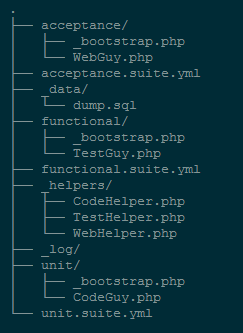
Codecept Generated Fies
At the moment I’m mostly concerned with acceptance testing. Codeception has a unit testing module, which is built around PHPUnit. Their idea is to make writing tests simpler. I could adopt it, but it means I would have to re-write my tests in the Codeception syntax which is essentially just an abstraction layer. At this point it is a waste of time, so I can simply get rid of the unit, and functional modules and re-organize my test directory to look like this:
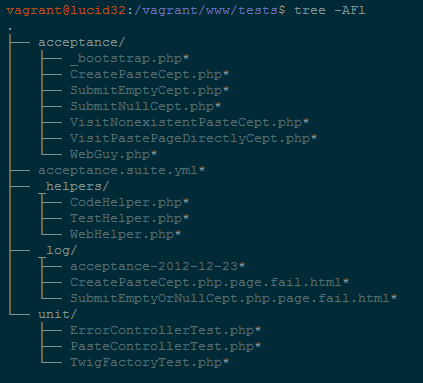
Test Directory
As you can see, I moved my unit tests to unit/ and created bunch of new tests in acceptance/. The nice thing about these frameworks is that PHPUnit will ignore all of the Codeception code, and Codeception will ignore PHPUnit tests so they can co-exist in the same directory.
To start writing Codeception tests we need to first change the project url in the acceptance.yaml file:
class_name: WebGuy
modules:
    enabled:
        - PhpBrowser
        - WebHelper
    config:
        PhpBrowser:
            url: 'http://localhost'
Watch out for the trailing slash in the URL – if you include it, it will mess you up later.
Once this is done, we can use the Codeception framework to generate a test code stub like this:
codecept generate:cept acceptance CreatePaste
It will create a new file tests/acceptance/CreatePasteCept.php with some basic sample code. We can expand it to a full test like this:
wantTo('Create a new paste');
$I->amOnPage('/');
$I->see("Paste It");
$I->fillField('content', 'This is a triumph...');
$I->click('paste');
$I->see('Your paste is available here');
As you can see, writing Codeception tests is actually much easier than creating PHPUnit classes. The syntax is very simple, but rather powerful. It actually uses Mink framework combined with Goutte Web Scraper to emulate text browser behavior in PHP. You could use Mink directly, but Codeception provides us with a very high level layer of abstraction which makes writing tests incredibly intuitive.
The testing layer is actually driven by PHPUnit so running the tests using the command codecept run will bring up a very familiar interface:
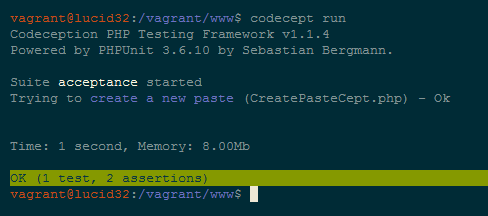
Codeception Test
Let’s create another test – this time let’s hit up a non-existing page:
codecept generate:cept acceptance VisitNonexistentPaste
The PHP code can be structured like this:
wantTo('Visit paste #99999');
$I->amOnPage('/99999');
$I->see("No such paste");
Assertions are done using the see() method, and the browsing is done using amOnPage(). The whole test takes shape of a narrative. You essentially describe what you want it to do, and it does it. Let’s do another one:
codecept generate:cept acceptance VisitPastePageDirectly
Here is the PHP code:
wantTo('Visit /paste directly with no input');
$I->amOnPage('/paste');
$I->see("Paste content cannot be empty");
You actually do not need to use the generate:cept command to create these. Here is a little secret – any file you create in the acceptance/ folder, which has a name that ends in Cept.php will be processed when you run codecept run. If you don’t want a file to be processed, do not end it’s name in Cept – it’s that easy.
Here are two more quick tests – one to submit an empty string, expecting to see an error:
wantTo('Submit an empty string');
$I->amOnPage('/');
$I->click('paste');
$I->see('Paste content cannot be empty');
And here is a test to submit the form with a null value. Note that this could never really be tested using the browser, but it could potentially happen in production due to some hidden Hisenbug that was introduced somewhere else entirely:
wantTo('Submit null value');
$I->amOnPage('/');
$I->submitForm('#paste', array('content' => null));
$I->see('Paste content cannot be empty');
Running multiple tests produces very nice output that looks like this – it’s actually prettier than the raw PHPUnit which just gives you dots as it tests, and gets kinda ugly when you set it into verbose mode:
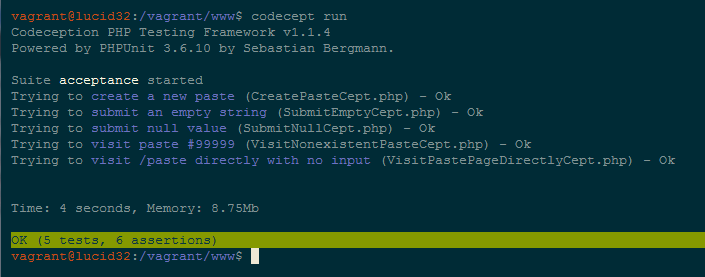
Multiple Tests with Codeception
Running these tests from the command line is much faster, and vastly more consistent and efficient than actually trying to manually test the application by hand via the browser. The tests always run the same, and take mere seconds whereas your manual tests may be inconsistent, and may not always cover all the important use cases.
Most of the time, you should not be writing this many tests at once. They should organically develop with your application. You get an idea how to structure your code, you write a unit test, you write the code, test it, then you write an acceptance test and plug the code into the app. Right now we’re just playing catch-up.
GeSHi Syntax Highlighter
Our Pastebin is now fully functional, but it is lacking one of the distinct features of this class of applications – code highlighting. Implementing such a feature is a non-trivial task, but fortunately someone already did it for us. The great thing about working with a mature language such as PHP is that there is a huge number of free, open source packages and projects for just about any occasion.
GeSHi is a code highlighting library. It takes a string, parses it and gives it back to you, wrapped up in HTML that colorizes it according to a set of rules defined for particular programming language. It is actually the same engine I use in this blog to colorize my code snippets, so I know it works fairly well.
Like most projects, GeSHi is available via Composer. Granted, I believe the package listed there is actually a mirror, but for our purposes it works just as well. To add it to our project we simply need to add a single line to our composer.json file:
{
    "require": {
        "twig/twig": "1.*",
        "gabordemooij/redbean": "dev-master",
        "easybook/geshi": "dev-master"
    },

    "autoload": {
        "psr-0": {
            "SillyPastebin":       "src/"
        }
   }
}
Now we run composer update and the code will be downloaded, and placed in vendor/ folder and registered with the Composer autoloader.
Using GeSHi is actually very simple. Let me give you an idea how it works with a little snippet of pseudo-code. This is all you really need to do to parse and output highlighted code:
$geshi = new GeSHi($some_code, $some_language);
echo $geshi->parse_code();
GeSHi output looks a bit like this:
I know this because I looked at the examples listed on their webpage. This is of course followed by more code wrapped in span and div elements. The HTML that is generated is a bit of a mess, but we don't really care as long as it works.
Since we know roughly how our output is going to look we can design a unit test to anticipate it. Something like this should do the trick:
public function testShowThankYouWithValidContentAndPHPLanguage()
{
$content = "some content";
$language = "php";
$temp = $this->ctrl->addNewPaste($content, $language);
$this->expectOutputRegex("/ctrl->showPasteContent("/".$temp);
}
We can also create an acceptance test that will submit some PHP code and test to see if it is displayed properly:
wantTo('Create a new paste in PHP');
$I->amOnPage('/');
$I->see("Paste It");
$I->submitForm('#paste', array('content' => $code, 'language' => 'php'));
$I->see("Your paste is available here");
$I->click("#");
$I->see($code, '//body/code/pre');
If we run these tests right now they will blow up. So lets modify our code to make them pass. First, lets tackle addNewPaste() method:
/**
* Adds new paste to the database.
*
* @param string $content a new paste content
* @param string $language a GeSHi suppoerted language (default is text)
* @throws InvalidArgumentException if $content is null or empty
* @return integer valid pasteID (insertion id)
*/
public function addNewPaste($content, $language='text')
{
if(empty($content))
throw new \InvalidArgumentException("Paste content cannot be empty or null");
else
{
R::setup();
$paste = R::dispense("paste");
$paste->content = $content;
$paste->language = $language;
return R::store($paste);
}
}
I'm making $language and optional argument as not to break any of the existing code. If second argument is not present, we'll just assume that this is a plain text paste and skip highlighting. Either way, we add the new attribute to the bean and store it. Because we have never frozen our schema, RedBean automatically adjusts the paste table to accommodate the extra field.
Next, lets modify showPasteContent():
/**
* Renders a paste as a web page.
*
* @param string $uri A valid URI with a paste address
* @throws InvalidArgumentException if the URI is invalid
*/
public function showPasteContent($uri)
{
if(!$this->isValidPasteURI($uri))
throw new \InvalidArgumentException("Invalid paste ID");
else
{
$pasteID = substr($uri, 1);
R::setup();
$paste = R::load("paste", $pasteID);
if(empty($paste->content))
{
echo $this->twig->render("nosuchpaste.html", array('pasteID' => $pasteID));
}
else
{
if($paste->language == 'text' or empty($paste->language))
$highlighted = $paste->content;
else
{
$geshi = new \GeSHi($paste->content, $paste->language);
$geshi->enable_line_numbers(GESHI_FANCY_LINE_NUMBERS);
$highlighted = $geshi->parse_code();
}
echo $this->twig->render("show.html", array('pasteID' => $pasteID,
'content' => $highlighted,
'raw_content' => $paste->content));
}
}
Our Twig template will receive both the highlighted and non-highlighted copies of the paste. Why? Because we can display the non-highlighted code in a text box for easy copying, and the highlighted, enumerated code above it for easy reading.
Now we can modify the show.html template:
{% include 'header.html' %}
PASTE #{{ pasteID }}
{{ content|raw }}
Raw Content
{% include 'footer.html' %}
Note that I need to use content|raw in order to prevent Twig from escaping the HTML. If you recall part 3 of this series, I specifically set up Twig to auto-escape everything in order to prevent XSS issues. Since our highlighted code is chewed up and mangled by GeSHi it is probably safe to output without escaping. Besides, that's the only way to get the highlighting to actually work. If I don't display it raw, I will get bunch of HTML code in my display box.
Now comes the tricky part. We need to modify the form.html template and add a pull-down menu from which the user will be able to choose an appropriate language. I actually want this to cover all the languages that GeSHi supports. How do we do that? Well, let's start like this:
{% include 'header.html' %}
Paste It
I don't believe GeSHi has a function that dumps out a list of supported languages. Fortunately we can generate one ourselves. GeSHi keeps highlighting rules for each language in its own separate file in geshi/geshi/ directory. Each of these files is named after the language it describes - so for example the file for PHP highlights is geshi/geshi/php.php. Thus we can easily generate a list of languages based on the contents of that folder:
ls -1 vendor/easybook/geshi/geshi > templates/language_select.html
Now it is time for some vim magic:
" remove file extensions
:%s/.php//g
" add html tags
:%s/^/
Now we have a lovely HTML file that will plug in directly into our form template.
Here is an interesting question: what happens if we create a paste with a totally fake language. Granted, our UI limits the user to pre-defined choices which we know will work - but what if someone just sends a POST request, or modifies UI on the client side? Will it blow up? Will it keep on chugging? I couldn't answer that so I wrote this test:
public function testShowThankYouWithValidContentAndNonexistentLanguage()
{
$content = "saxophone";
$language = "gandalf";
$temp = $this->ctrl->addNewPaste($content, $language);
$this->expectOutputRegex("/ctrl->showPasteContent("/".$temp);
}
It actually passed without any issues. It turns out that GeSHi is very tolerant and it will still process, and enumerate code you pass into it, even if it knows nothing about the language. In fact, the entire framework is built to be extensible - so if I wanted to I could create a highlight definition file for the gandalf language and plug it into GeSHi at a later time.
I was initially considering writing some validation code to prevent something like this from happening, but as is is, I don't really see any harm in letting it slide. If someone somehow pastes code using a non-existent language, it simply won't highlight it, but it will enumerate each line. This is not a terrible way to go.
Picture Time
I don't think I have ever shown you how the finished product looks like. I guess it is time to do that now. As they say, a screenshot is worth three chapters worth of manual... Or something like that. This is the main paste page with the neat drop-down box:
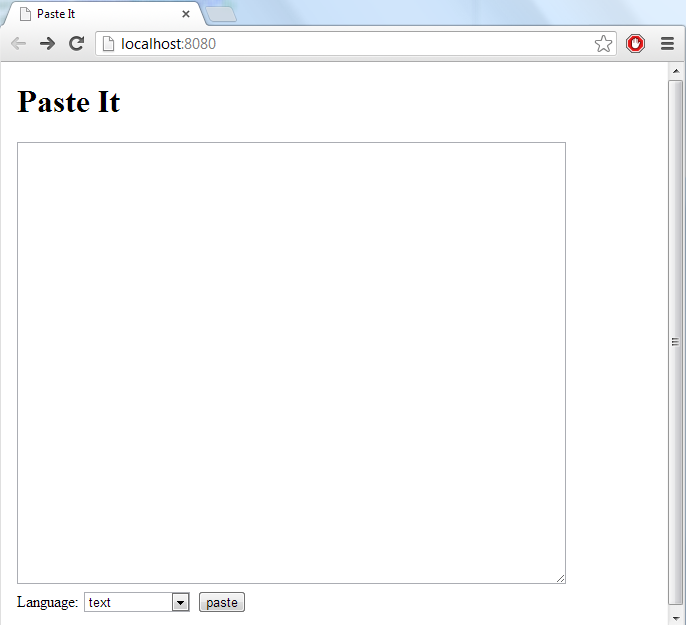
Main Page
This is how a GeSHi processed PHP code looks like when it is retrieved from the database and pasted onto the screen:

An actual paste with GeSHi highlights.
Simple, functional, does what it needs to do. We are almost done with this project. There are only a few finishing touches that are left to do here.
Extra Validation with RedBean Models
Our PasteController does a pretty good job validating the user input (in a large part due to our test-driven approach). However if I really wanted to prevent the "gandalf" use case from happening, I would have to implement a check function. I could make it part of the PasteController but better place for it would be a model class.
RedBean lets you define models by extending RedBean_SimpleModel class and then binds them to it's beans using FUSE. So you continue using beans as normal, but when you for example attempt to store one, FUSE checks if a corresponding model exists, and then instantiates it, dynamically binds all the instance variables, and calls the update() method if it exists. That's where we would put our validation code.
So for shits and giggles, lets create a Paste model:
mkdir src/SillyPastebin/Model
touch src/SillyPastebin/Model/Paste.php
The implementation Paste.php would look something like this:
Why am I throwing an exception? Well, in cases like these, where you are dealing with high level of behind the scenes arcane magic, the best way to see something changed is to make your tests blow up in a spectacular way. My tests pass with flying colors which means I'm doing something wrong... And the thing that I'm doing wrong is actually something that I am not willing to change.
The RedBean's head developer Gabor de Mooij is not a fan of namespaces. You can actually see little passive aggressive jabs against this paradigm in the RedBean documentation. As a result RedBean is a little bit namespace blind - which works very well if you organize your code without any namespaces. Since we make extensive use of this concept we have to jerry-rig RedBean to use our own naming conventions.
Fortunately this is rather simple - we just create a new helper class:
touch src/SillyPastebin/Helper/ModelFormatter.php
The ModelFormatter.php needs to contain some boilerplate code ripped off directly from the RedBean wiki. The last line is the important one - it tells RedBean how to find our models:
By default RedBean would look for a class named Model_Paste in the global namespace. We simply change that convention and tell it to look for \SillyPastebin\Model\Paste instead.
Now we simply have to add a single line to the constructor of PasteController.php:
public function __construct()
{
$this->twig = \SillyPastebin\Helper\TwigFactory::getTwig();
R::setup();
\RedBean_ModelHelper::setModelFormatter(new \SillyPastebin\Helper\ModelFormatter());
}
By the way, it is probably worth noting that as I was doing this, I made another small change. As you can see I moved the R::setup(); call from the individual methods to the constructor. Since this is a static call, it actually only needs to be done once when the object is instantiated and works from that point on. So we get all our configuration in one place.
Running tests with the code like this caused the exception to be triggered as it should. Knowing that the FUSE magic has worked, we can now modify our model to include some validation code:
language))
$this->language = 'text';
if(empty($this->content))
throw \InvalidArgumentException("Paste cannot be empty or null");
}
}
I'm actually a bit too lazy to implement the GeHSi language validation right now, so I just added some extra checks. This code is mostly redundant but it helps to illustrate how this concept works. The instance variables of the bean, become available as instance variables of your model, and you can manipulate them as such. It is pretty straightforward, and you can make it as simple or as complex as you want.
You can add triggers to your model for all the different actions you can perform on a bean. Here is a decent overview that shows you how it works.
Switching over to MySQL
It's time to move away from SQLite and start using real database. So let's log into our MySQL database as root:
mysql -u root -p
Now let's create a new database, a new user, and grant that user some privileges:
create database silly_db;
create user 'silly_user'@'localhost' identified by 'some_silly_password';
grant all on silly_db.* to 'silly_user'@'localhost';
For now I gave the user all the privileges because RedBean needs to create and alter tables. Once we are ready to deploy this into production we can revoke the dangerous privileges and freeze the schema.
Next, I figured we might as well create a config file that users could edit with their DB information:
touch src/SillyPastebin/Config.php
Contents would be very basic - something like this:
Finally, here is the modified constructor of the PasteController.php:
public function __construct()
{
$this->twig = \SillyPastebin\Helper\TwigFactory::getTwig();
$host = \SillyPastebin\Config::mysql_host;
$db = \SillyPastebin\Config::mysql_db;
$user = \SillyPastebin\Config::mysql_user;
$pwd = \SillyPastebin\Config::mysql_password;
R::setup('mysql:host='.$host.';dbname='.$db, $user, $pwd);
\RedBean_ModelHelper::setModelFormatter(new \SillyPastebin\Helper\ModelFormatter());
}
In case you are curious of what kind of schema was built by RedBean, we can actually log in and snoop. Here is what I saw after running my round of unit and acceptance tests:
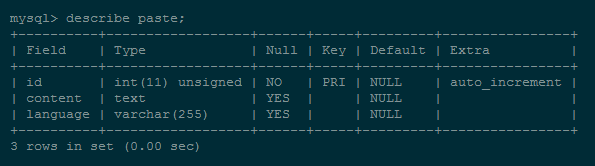
Paste Table as build by RedBean
This is actually not terrible. Choosing VARCHAR(255) for language seems excessive (although I don't thing varchar actually reserves the max space so we're probably not wasting anything), and INT(11) UNSIGNED for the primary key might be a tad small if we were planning to build a live site. Still, those are pretty good guesses. And it all happens auto-magically and behind the scenes.
Here is the good news: prior to deployment, I could go in and actually modify and optimize this table to be more to my liking, and then add a single line somewhere in my code:
R::freeze( true );
This would freeze the shcema and prevent RedBean from changing it, forcing it to abide by whatever data types and constraints I put onto it.
Conclusion
This would be it. I believe I hit all the important lessons I wanted to impart on you. We have built a fully functional pastebin in under a thousand lines of code (including unit and acceptance tests) using industry's best practices and bunch of popular third party tools. We used a test driven approach and used two popular testing frameworks to do extensive unit and acceptance testing on our code. We used a runtime dependency manager to ensure the code we used is portable and that we do not need to commit third party code to our repository. We conformed to the PSR-0 and learned about PHP autoloading. All in all I hope this was a good learning experience.
Wait... How do I know how many lines of code we wrote? I checked:

Lines of Code
Note that the WebGuy.php class was auto-generated by Codeception, so those 614 lines can be subtracted from the total, since we did not write them.
I hope this series helped to illustrate that despite it's numerous flaws, PHP is not a completely terrible language. You can use it to write organized, manageable and aesthetically pleasing code. It just takes a little bit of effort. If you would like to embark on another journey into the land of PHP with me at some point in the future, let me know in the comments.
If you are interested, code for Silly Pastebin is available on GitHub.
Do you believe SQLite would be inadequate for your pastebin? I have little experience in this area so this is just an honest question. What does using MySQL get you? According to the SQLite documentation,
So unless you intend to become the dominant pastebin website on the Internet I would think you fall into that 99.9%.
@ Chris Wellons:
You’re right – it is probably perfectly adequate. I was thinking more along the lines of “lets take this to the next level now” type of thing. I’m kinda building this pastebin as if it was bigger application.
Other than that I guess it is just gut reaction to the “Lite” part of the name. Oh, this DB is lite, let me get the heavy one for production environment. ;)
Seems that when it’s used properly, PHP isn’t all that bad really… I’m sure all people who’ll possibly maintain my PHP code from now on (even if it’s probably just me) will be very grateful for these posts :) .
as an offtopic sidenote:
when I wanted to check other parts in series and clicked tag “php like a pro”, only parts 1 to 3 were listed – maybe there’s some problem with your database?
@ MacHala:
Thanks.
Oh, an all 5 parts seem to be listed now. I’m using WP-Cache to… Well, cache the pages so chances are you hit a cached page that was kinda old. Can you try again?
@ Luke Maciak:
Now it displays correctly, cache on server really seems like culprit…