Whenever you sit down to create a new website (or a web project), there is usually a litany of things you need to do before you can start hacking. And I don’t include brewing a strong cup of coffee in that list, although it is nevertheless very important. I’m talking about rather boring, menial tasks of “setting up” your environment to the point where a website is ready to be born.
The days when you could just drop an index.html in public_html/ are long gone. Modern front end development is much more involved. And for the most part this is a very good thing. It helps us create quality things rater than the kind of Microsoft Front Page generated “websites” that populated the Geocities ghetto in the nascent years of the interweb.
Typically, when I sit down with my cup of coffee, I go through the following motions:
- First, you need some HTML boilerplate to start off. It doesn’t really matter if you are designing a stand-alone website, a Twig or Django template or something else. Most of the time you need some robust starting point. So chances are you are going to be downloading the very popular HTML5 Boilerplate and unzipping it into your project folder.
- Next step is usually to ensure that you have some sort of nice UI framework – something to make nice buttons and pretty forms. This is by no means necessary but bare HTML forms are quickly falling out of grace and it is usually a good idea to add a little bit of flair to them. Plus, you do want a robust CSS grid implementation. You could fuck around and try to design your own layout with float elements but why bother if you could just take one that works and has been thoroughly tested. So chances are you will also be grabbing the Twitter Bootstrap package and adding that to your folder.
- Twitter Bootstrap consumes jQuery as a dependency, but does not include it in it’s package (and rightfully so). So in order to get the flashier bits of Bootstrap working you need to download it as well.
- If there will be a lot of scripting involved in the project, you might want to also grab Underscore.js since it adds so much general purpose utility to your toolkit.
- JavaScript tends to be one of those languages which really, really benefit from linting code to ensure quality. Languages like Ruby or Python simply won’t allow you to be sloppy. JavaScript interpreters however are extremely permissive, and will swallow quite terrible code without batting an eyelid. The web is full of unmaintainable spaghetti code JavaScript and you should not be adding to the problem. So you probably want to make linting with something like JSHint a part of your workflow.
- In addition to linting Javascript you should also be linting your HTML. Compared to the (X)HTML4 craziness, HTML5 spec is actually mostly sane and rather nice. It is actually not difficult to write code that conforms to the spec, and rigid adherence to the rules actually improves the readability of your code. So you should be validating your pages as you write them.
- Javascript can create performance bottlenecks so if you are using large, expansive scripts you could really benefit from adding a minifier to your toolkit. Running your code through something like Uglify.js or Google Closure Compiler really goes a long way in making your project more responsive.
- As you are writing JavaScript, chances are you will want to test it. So you need a unit testing framework – so go ahead and download Qunit.js and add it to your project folder.
- At this point you are already 15-20 minutes into the process so you might as well git init in your project directory. But that also carries some weight. All of these components you just downloaded are now littering your project folder with over a dozen files. Nearly all of these files are standard boilerplate stuff you will never, ever touch. Now the question is, do you commit that mess to your repository? Doing so means you will have a lot of unnecessary static redundant garbage in there. And every time Bootstrap or jQuery releases a new version you will have to update and commit it with your project. This is not necessarily a big deal, but I (and many other people) don’t like it very much. I’d rather keep only the stuff I actually work on, or edit regularly in the repository. But when you do that, then it means you have to re-download all these prerequisites all over again when you decide to clone the repository or fork it.
All of this is problematic and tedious stuff web designers deal with every single time they start a new project. The funny thing is that there is no need to do all of this. Most of that decision making and file shuffling could be easily automated and streamlined.
For example, there is no need for you to download Boilerplate, Bootstrap and jQuery as separate chunks. You can actually download the whole kit and caboodle from Initializr.com. It comes pre-packaged as a single zip file that includes everything you need to set up a simple website (except Underscore and Qunit but those are more for JavaScript intensive web apps rather than regular sites).
This is incredibly useful, but it solves only one of our two (or three/four) problems. Initializr helps you scaffold a new project really quickly but does nothing in terms of managing the dependencies. You still end up with either junk in the repository, or a 12 step setup instruction process in Readme.md. How do you manage dependencies and static assets?
Bower
Personally, I’m very fond of Bower. It was designed by folks at Twitter and essentially it is the PHP Composer equivalent for the front end development. For example, it allows you to do something like:
bower install jquery
This command will find the jQuery package in the Bower package repository, download it and put it inside components/ folder. This is more or less how it looks like:
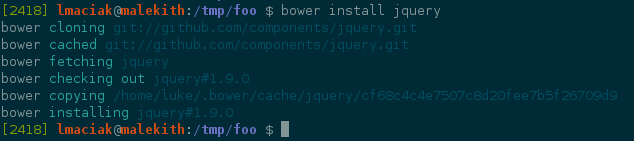
Installing jQuery with Bower
Much like Composer, Bower is controlled by a single config file in the root of your project directory. That file is called components.json and it looks like this:
{
  "name": "YourProjectName",
  "version": "0.0.0",
  "dependencies": {
    "jquery": "~1.9.0"
  }
}
As you can probably guess, the dependencies section is the important one. You define them by package name and version number ensuring you get the correct version. Here is something Bower does but Composer cannot do: it is not limited just to pre-defined packages. Bower will happily fetch and install anything into the components/ directory as long as it has a web accessible URL. For example you can do something like this:
{
  "name": "YourProjectName",
  "version": "0.0.0",
  "dependencies": {
      "bootstrap": "http://twitter.github.com/bootstrap/assets/bootstrap.zip",
  }
}
This will fetch the official bootstrap download package right off their download page, and unzip it for you. This is not as robust and dependable as linking to pre-defined package but it allows you to use assets and scripts that do not have a bower compatible package as of yet. If the URL you specify is a Git repository, Bower will be more than happy to check it out for you.
The components/ directory is configurable by a separate file .bowerrc which is also a JSON file:
{
    "directory": "path/to/components"
}
Why a separate file? Well, the idea is that some other package management tool (like Components, Jam or perhaps Volo) could consume components.json config file (they all use nearly identical format) and plugging bower specific values there would ruin portability.
The nice thing about using bower is that you can now safely add the components/ directory to your .gitignore and never, ever worry about committing static boilerplate garbage into your repositories. If and when you clone it later, you can automatically fetch all the needed dependencies by doing:
bower install
Let me sum this up for you. Here is what you get:
- Tool that automatically tracks and downloads dependencies
- Ability to add arbitrary files as dependencies via URL
- No need to commit the dependencies with your code
The price you pay for all of this is putting a single json file at the root of your project. To me this is worth it.
That said Bower is for managing dependencies only. It follows the unix philosophy of doing one thing, but well. So does not scaffold anything for you. Not only hat, but if you are using bower to manage dependencies you really can’t take advantage from the Initializr scaffolding… So you are back to square one, where you have Boilerplate, Bootstrap and jQuery installed as separate entities which you need to manually combine in your HTML files.
The other issue I mentioned above was linting, concatenating and minifying your scripts. The tools to do this are actually available as online services, but you shouldn’t be using these. The last thing you want to do when coding is to stop everything, open up a browser and start copy/pasting stuff into a textarea box on the web. Ideally you want to use a command line tool – something that is quick, easy and can accomplish all of these things in a single operation.
GruntJS
Enter GruntJS – a build tool for the front end. It belongs to the “configure rather than code” school of thought, but do not get discouraged. Unlike a lot of the XML based build tools, this one uses a config file that is basically a Node.js script. This means you can easily define new functionality as a Node.js function, and make it a build task. The neat thing is that you don’t have to. The big chunk of your average grunt config file is a large JSON object that consists of a built in task name, the list of files it is to be performed on and custom config options for that task.
What kind of tasks does Grunt support out of the box? It will:
- Lint your JS code with JSHint
- Concatenate your JS and CSS files
- Minify JavaScript with Uglify.js
- Watch your project folder and trigger build tasks on file change
- Let you run a local mini-server on any port you wish
- Integrates with Qunit and let you run tests from the command line using PhantomJS
If that wasn’t enough, it also sports a huge plugin database (just look at the home page) which greatly extends its already formidable functionality. There are plugins to validate HTML5 code, wrapper plugins for different JS and CoffeScript linters, plugins that integrate other unit testing frameworks (like Mocha or Jasmin) and more. All of these are simple Node.js packages which can be installed via quick npm command.
Just to give you an idea, here is a sample grunt file – one that the tool might auto-generate for you if you run grunt init and answer a few questions:
module.exports = function(grunt) {
  grunt.initConfig({
    lint: {
      // lint everything in lib and test dirs
      files: ['grunt.js', 'lib/**/*.js', 'test/**/*.js']
    },
    qunit: {
      // run tests with PhantomJS on these files
      files: ['test/**/*.html']
    },
    concat: {
      // concat everythin in lib, put it in dist
      dist: {
        src: ['lib/*.js'],
        dest: 'dist/scripts.js'
      }
    },
    min: {
      dist: {
        // same files as concat task
        src: [''],
        dest: 'dist/scripts.min.js'
      }
    },
    watch: {
      // lint and test files as they are changed
      // use same files as lint task
      files: '',
      tasks: 'lint qunit'
    },
    jshint: {
      // configuration options passed to JSHint
      options: {
        curly: true,
        eqeqeq: true,
        immed: true,
        latedef: true,
        newcap: true,
        noarg: true,
        sub: true,
        undef: true,
        boss: true,
        eqnull: true,
        browser: true
      },
      globals: {
        // don't complain about jQuery and Underscore
        $: false,
        jQuery: false,
        _: false
      }
    }
  });

  // Default task (executes when you run grunt without arguments).
  grunt.registerTask('default', 'lint qunit concat min');

};
As you can see it is fairly readable. Here is the best part: if you find yourself in a situation (an you will – you always will) where neither built-in tasks, nor the available plugins will help you, adding a custom build task is as easy as:
grunt.registerTask('mytask', "description of my task", function() {
    // do stuff here
});
In other words, Grunt is sort of a “best of both worlds” scenario. 90% of the time you just configure tasks, but when you reach that 10% condition where your build process is just too crazy and too specific to be covered by third party plugins, you can easily code around it.
It is my honest opinion that if you are not using Grunt, you are either doing way to much stuff manually, or conversely not doing nearly enough to ensure the high quality of your code. In either case you are fucking yourself over, so do yourself a favor and take 10 minutes out of your busy schedule to add it into your toolkit. It makes a huge difference.
And yes, you could accomplish everything Grunt does with a Makefile or a Rakefile but those are not as portable (welcome to the how do I *make* on Windows
-ville, population: half of the fucking interweb) and they take longer to set up. Why? Because you have to code almost everything by hand. Grunt comes pre-configured with a nice set of tools, and has tons of plug-and-play plugins that are just a quick npm install away.
Now, if there was only a single tool that could scaffold, manage dependencies and do all the nice shit grunt does at the same time – that would be quite useful, wouldn’t it? It would be like having your personal servant handling all the mundane, boring stuff and letting you write code with ease and comfort. Too bad that such a tool doesn’t exi…
Wait, it does! What? Did you think I’m gonna write this whole long post and end it on a sad note? No, a personal servant for front end development exists and it is good.
Yeoman
The project is called Yeoman and it is quite a marvelous little tool.
Internally it uses Bower for dependency management and Grunt for build management but it is not just a simple wrapper. It ships with a whole kit of plugins and extensions, a grab bag of external tools, and meticulously written build scripts that just work. Out of the box, Yeoman will not only concatenate and minify JS and CSS – it will also:
- Automatically scaffold HTML5 Boilerplate and manage dependency injection into index.html
- Manage dependency loading using RequireJS AMD modules or new ES6 module proposal
- Compile Coffeescript code to JS
- Compile Compass style sheets to CSS
- Optimize your images using JPEGTran and OptiPNG
- Have a live-reload feature which will let you see your changes in the browser without reloading the page
All I can say is: download it and try it. It is very, very neat tool. Let me just give you a little peak at how it operates. This is what you are going to see if you run the yeoman init command:
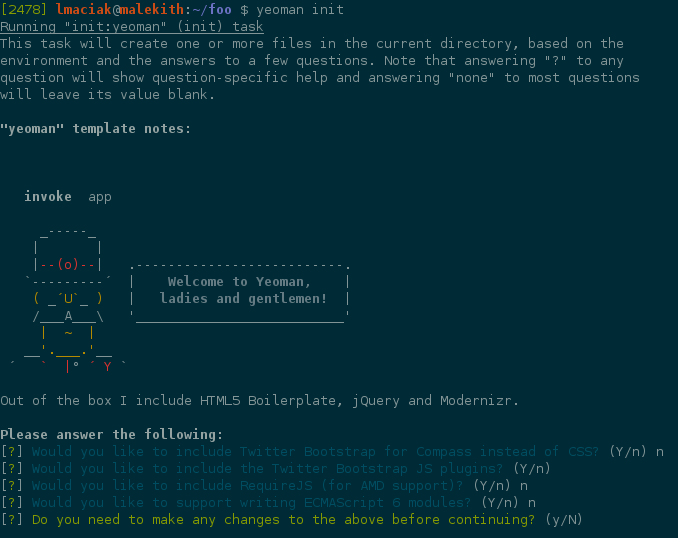
Yeoman init prompt
And based on your answers this is approximately what will be generated in your current directory:
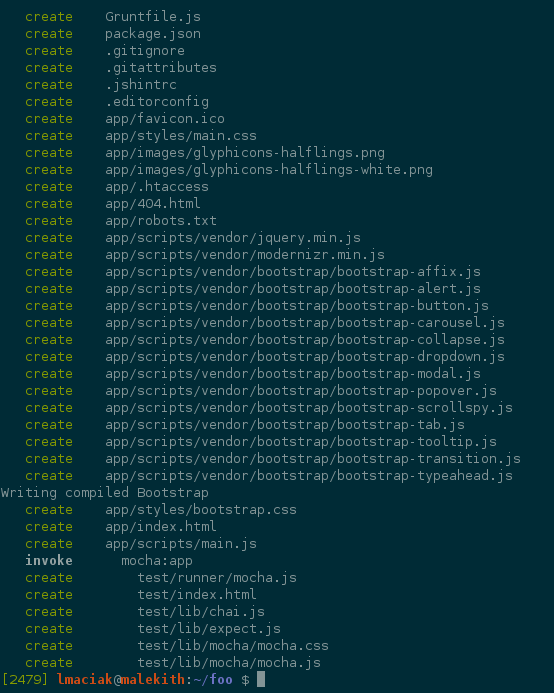
Yeoman generated files
As you can see from the screenshots, HTML5 Boilerplate, Twitter Bootstrap, jQuery and Modernizr.js are included in a standard package. If you need something extra, you can add it using the yeoman install command which runs bower on autopilot for you:
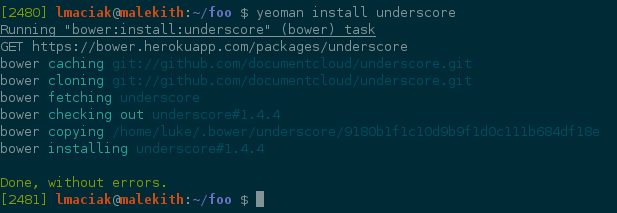
Installing Underscore.js with Yeoman
I could probably spend quite some time talking up this tool, but perhaps it is better if I show you. Here is a guy scaffolding a very basic HTML5 page with Yeoman and Bootstrap in about 5 minutes. I’m showing you this video rather than some of the more official demos because those like to show off the Compass and CoffeeScript related features, whereas this guy just does a simple css site, and highlights a few interesting quirks of this tool in the process:
It is an extremely powerful tool, but it also is very opinionated one. By that I mean it makes a lot of decisions for you. Whereas tools like Bower and Grunt are almost infinitely configurable, and get out of your way allowing you to structure your project the way you want, Yeoman likes to impose a structure upon you. Granted, that structure and the defaults it enforces are quite sane, and actually follow best practices and time tested patterns. Still, some people don’t like that.
Sometimes Yeoman can be a bit of an overkill. Especially when your project is to create quick and dirty, single page HTML5 + Bootstrap website. For all intents and purposes such a project only really needs 3 files:
- A components.json file with a list of dependencies
- A minimalistic grunt.js
- The index.html file with the actual website
- Optional .gitignore and package.json files
Yeoman will give you that, but also a lot of additional cruft that can be extremely useful for bigger projects, but which you will probably end up chucking.
This is why I rolled my own little scaffold: Instant Website. What does it offer you? Well, let me go over the files it contains.
The web/ directory contains the actual stuff you will be deploying to the server. This includes index.html is standard pristine, validating HTML5 boilerplate. It assumes that you will be using Bootstrap and jQquery and that these will be found in their own respective folders under web/components/. You will probably note that the repository does not contain these. Why? Because it does not need to. There is a components.json file in the root of the directory that looks like this:
{
  "name": "InstantWepbage",
  "version": "0.0.1",
  "dependencies": {
    "bootstrap": "http://twitter.github.com/bootstrap/assets/bootstrap.zip",
    "jquery": "~1.9.0"
  }
}
It tells Bower to download the latest twitter bootstrap zipfile, and the latest jQuery package. When you clone this repository all you need to do is run bower install and your static assets will fall into place immediately.
Next, there is my grunt.js file:
module.exports = function(grunt) {
  grunt.initConfig({
    watch: {
      files: ['index.html'],
      tasks: 'htmllint'
    },
    htmllint: {
        files: 'index.html'
    },
    server: {
        port: 3000,
        base: '.'
    }
  });
  grunt.loadNpmTasks('grunt-html');
  grunt.registerTask('default', 'server watch');
};
This essentially gives you three tasks: validate HTML with grunt-html plugin, watch files and validate them as they are changed and run local server. Note that I don’t have any JS linting or minification in place because those things are a bit out of scope for this project. This is designed to scaffold very, very simple web pages – not web apps. For web apps, definitely use yeoman.
You have probably noticed that grunt-html is not part of the basic Grunt package. You need to install it as a plugin. This is where the package.json file comes in:
{
  "author": "",
  "name": "InstantWebsite",
  "version": "0.0.1",
  "dependencies": {},
  "devDependencies": {
    "grunt-html": "~0.2.x"
  }
}
That defines grunt-html as a development time dependency so that it can be downloaded and installed at your leisure. You are of course not required to use Grunt, and if you do not, you can skip installing the plugin altogether.
How do you use this thing? Like this:
git clone https://github.com/maciakl/InstantWebsite.git
cd InstantWebsite
bower install
npm install
grunt
Or, let me show it to you in a picture form because that’s always fun:

Bootstraping with InstantWebsite
Now you have a basic scaffold, a server running on port 3000 and Grunt will watch your folder for changes and run all the HTML files through a HTML5 linter/validator ensuring your code is nice and non-broken.
I use this repository to quickly bootstrap and scaffold pages such as my teaching site. You know, stuff that does not require extensive scripting. One advantage of doing it this way, rather than with Yeoman (other than the lack of cruft) is that Yeoman usually ships with a very bare bones HTML template.
I actually made it a point to include a fairly well designed a basic structure as part of my package. It’s actually the same template that ships with Initializr (which in turn is one of the standard Bootstrap examples from their webpage) so I’m not patting myself on the back here. It’s this one:

Template that ships with InstantWebsite
With Yeoman you start with blank canvas and you build your page up (which is great if you want to get an original design). Things like Initializr and my Instant Website repository give you a basic structure that you can tear down and simplify to fit your needs. So it is basically a choice between building from ground up, or re-purposing already well designed site.
Wow!! Thanks for the very informative post! I haven’t done any website work in a long time….and when I did it was hand-coded xhtml. Oh, how things have changed for the better!
Scott
@ Scott Hansen:
Yeah, I am quite amazed how the Node.js community is turning the front end world upside down. It’s primary purpose was really to be a back-end solution, but I love how people co-opted it to create all these interesting front-end development assist tools and frameworks around it.
Also, it is great to have a single modern standard to code for. Few years ago you had to decide whether you are going to use HTML4 strict, loose, XHTML or just say fuck it, and go commando with no DOCTYPE whatsoever. That’s like 3.5 arguments just about standards waiting to happen before any code gets written. Now we have HTML5 and it is pretty good. :)
Thanks for this writeup. I first heard about all these tools a couple months ago but I couldn’t find much information on how they compare.
I’ve become very fond of grunt ever since I saw its creator, Ben Alman, speak at Bocoup’s Roost conference back in December about it.
Regardless of what tools one uses, it sometimes gets pretty overwhelming and tedious to just begin a project, so I do a lot of prototyping before even writing the “real code.” Otherwise, I get distracted.
Pingback: Unit Testing Sinatra Apps | Terminally Incoherent
